
A Different Kind of Pi Project
Knowing how to cook is just as vital as knowing how to build.

As I wrote in my article about making stuff happen, owning your skills is the key to freedom — and cooking is no exception. Most folks today can’t cook a damn thing, and it shows — in their health, their dependency, and the steady decline of real skills. People have been programmed to mask up, shelter in place, and order DoorDash — like life itself could be outsourced and delivered. That same mindset has now turned a basic survival skill like cooking into an optional hobby.
Cooking isn’t just survival — it can be fun, satisfying, and even dessert can be clean and healthy when you make it yourself.
Which brings me to this project: a different kind of Pi project, one that starts not with a circuit board, but with flour, butter, and apples.
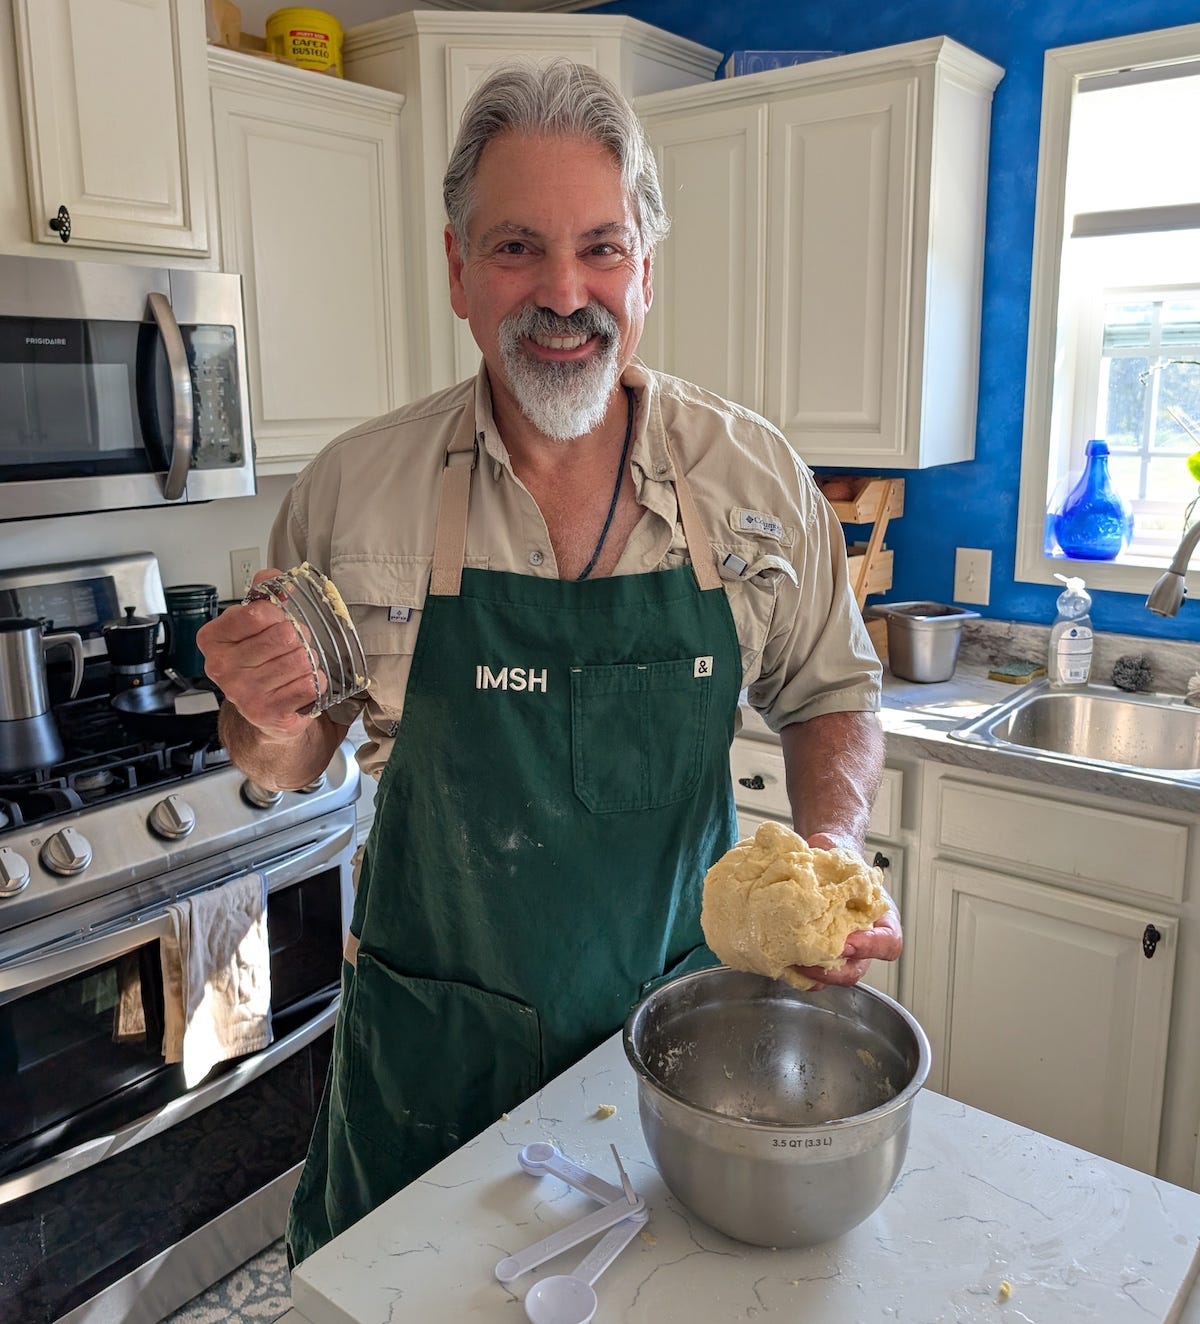
I’m no pro in the kitchen — this is me learning as I go, just like any other build. I leaned on a couple of good books for reference: Easy As Pie and The Perfect Pie. I’ve also been blessed to have some expert advice around me. Those are solid resources, but the real learning comes from actually doing it.
As American as Apple Pie
They call it “as American as apple pie” for a reason — it’s tradition, comfort, and a symbol of self-reliance baked into a crust. But tradition only means something if you can still do it yourself.
Apple pie isn’t health food by default — it’s sugar and carbs wrapped around fruit — but compared to the industrial garbage of fast-food desserts, boxed pastries, and delivery junk, a homemade pie you control is miles better.
But the real reason I chose apple pie is simple — I had a bag of them sitting around, and like any good project, you start with what you’ve got.
Before I dive into the crust, let’s talk about ingredients.
I stick with organic when I can — or at least food that isn’t beaten half to death by processing. The rule is simple: if the label reads like a chemistry set, it doesn’t belong in my kitchen. Flour, butter, apples — that’s it. Real inputs make for real results.
It doesn’t have to be expensive, either. Where I live, I can find good flour, butter, and produce even at the local Walmart Neighborhood Market. And here’s a trick most people never try: if you call their support line, you can sometimes get them to carry specialty items. That’s how I got mine to stock A2 milk.
The Crust
Every good pie starts with a solid foundation. A weak crust ruins the whole build, no matter how good the filling is. At its core, pie dough is just flour, fat, and water — but the way they come together is pure chemistry.
Ingredients
2 1/2 cups, Organic Unbleached White All Purpose Flour
1/2 teaspoon, Sea Salt
1 tablespoon, Granulated sugar
5–6 tablespoons ice water
I didn’t pick these ingredients at random. I stick with organic when I can, because many people aren’t just sensitive to the food itself but to the pesticides and residues that come with conventional farming. Using clean ingredients cuts that risk — and you can taste the difference.”
The Mix
I grabbed a good metal mixing bowl — it holds the cold better — and cut the butter into small ⅜" cubes using a pastry cutter, sometimes called a dough blender.
Pro tip: find one with a thumb grip — it gives you more control and makes the job a lot easier.
Then I tossed the bowl in the fridge until I was ready to mix.
When it was time to mix, I combined the flour, sugar, salt, and butter in the bowl and went at it with the pastry cutter. No food processor — it’s easier to clean up, and honestly, it’s better for you.
Working dough by hand builds grip strength. And while you’re at it, do your pushups or planks on your fists — it’s good for your striking and pistol work.
What you’re looking for is a coarse, crumbly mix — little pea-sized bits of butter coated in flour. That fat cuts into the grain, slows down gluten formation, and sets you up for a crust that bakes flaky instead of tough. If it looks like paste, you’ve overworked it. Keep it loose and crumbly — that’s the sweet spot. When the heat hits the oven, those butter nuggets melt and leave pockets behind, and those pockets are your flake.
The other key is temperature. Warm butter smears into the flour and ruins the texture. Cold butter stays solid until the oven, and that’s what builds the layers. That’s why I chill the bowl, cut the butter cold, and even keep the water iced. You’re not just mixing dough — you’re managing the chemistry so the crust comes out light and flaky.
Now bring it together. Add the ice water a tablespoon at a time, mixing gently with a fork or pastry cutter. Stop as soon as the dough just holds when you pinch it. Too much water and you lose the flake; too little and it won’t come together. The goal is a rough dough that holds its shape, not something smooth and overworked.
Once the dough comes together, I split it into two sections — one for the bottom, one for the top. Each gets wrapped up and chilled. Plastic wrap works, but if you’ve got something with fewer phytoestrogens, use that instead. Wrapping keeps the dough from sticking to the bowl, drying out, or picking up stray fridge flavors — so when you pull it back out, it’s still workable.
The chill does two things: it firms up the butter so it stays solid when you roll it, and it gives the gluten a chance to relax so the dough doesn’t fight you. Skip this step and you’ll end up with a crust that’s tough and hard to handle. After it’s cooled enough to set, it’s ready to roll out for the pan crust.
When the dough’s chilled and ready, dust your counter and rolling pin with flour and work from the center out, rotating the dough as you go. Don’t muscle it — every press of the pin adds friction, and friction is heat. Heat softens the butter, and once it smears instead of flakes, you’ve lost the game. If the dough starts to warm up or stick, stop and slide it back into the fridge for a few minutes. Keep it cool, keep it moving, and roll it out to about ⅛" thick.

Once the dough was rolled out, I eased it into the pan and let it settle without stretching. The trick is to lift and nudge, not push — pressing too hard makes the crust shrink back in the oven. I trimmed the edges and gave it a quick crimp so it holds shape. It doesn’t have to look perfect — rustic beats factory-stamped every time.
With the crust fitted and crimped, I slid the pan back into the fridge to keep it chilled while I worked on the filling ingredients. Cold crust, hot oven — that’s the formula for flake.
The Filling
You don’t have to stick with apples — blueberries, peaches, or whatever’s in season will work the same way. Apples are more of a fall and winter fruit, but the bigger rule I try to follow is to use what’s local and fresh. The closer it grew to where you live, the better it’s going to taste, the fewer miles it had to ride on a truck, and the more in sync it is with the season your body is living in. Eating with the seasons is how people ate for centuries — and it still makes sense.
But rules are made to be broken, so we’re going with apples. Usually it’s better to mix a few varieties for balance — a tart one for bite, a sweet one for body — but in this case I had a bag of organic Gala apples handy. Sometimes the best ingredient is simply the one you already have.
For the apple prep, I used a crank corer/peeler/slicer — you get peeled, cored, and evenly sliced apples in seconds.
Here’s a short clip of it in action:
Of course, you can always do this with a good sharp knife — it just takes longer. If you’re working through a big bag of apples, the crank tool saves your wrists and keeps things consistent. And as I mentioned in my earlier article, we’re tool-using monkeys — might as well use the right one for the job.
Filling Ingredients:
2 ½ pounds apples (about 6–7 medium)
1 cup granulated sugar
¼ cup light brown sugar
¼ teaspoon sea salt
Zest and juice of 1 lemon
Zest and juice of 1 orange
⅛ teaspoon ground cinnamon
¼ cup arrowroot
The balance here matters. The two sugars bring both sweetness and depth — white sugar gives you clean sweetness while brown sugar adds a little molasses backbone. The lemon and orange, zest and juice, cut through with brightness and keep the apples from browning before baking. The orange in particular brings a pronounced flavor that pushes the filling beyond the usual.
Pro tip: if you want a more subtle citrus note, dial the orange back and lean on the lemon — but honestly, try the orange.
A pinch of sea salt sharpens everything, and just a touch of cinnamon gives it that familiar warmth without turning it into a spice bomb. Simple, balanced, and it lets the apples stay the star.
Once everything was mixed, I didn’t just dump it straight into the crust. I pulled out a Dutch oven, set it over medium heat, and gave the apples a head start — about 15–20 minutes, covered, stirring now and then, until they were tender but still holding their shape. Cooking them down first melts the sugars, blooms the citrus and cinnamon, and drives off some moisture so you don’t end up with a soggy bottom crust.
For thickening, I went with ¼ cup arrowroot. It works like cornstarch but gives a clearer, cleaner finish — no cloudy filling, and it sets up nicely once cooled. I stirred it in toward the end, once the juices had loosened up, so it could blend in smoothly and set the filling without clumps. That way you control consistency instead of gambling on raw fruit thickening in the oven.
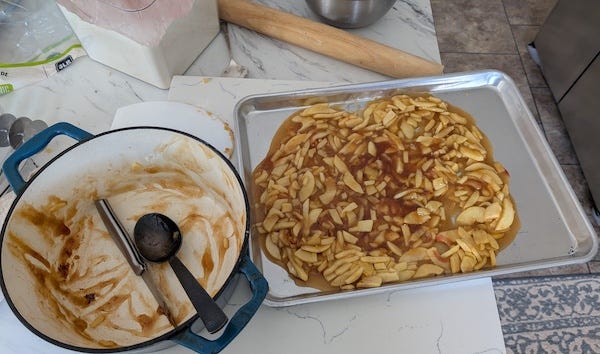
Spreading the filling onto a sheet pan pulls the heat off quickly. That keeps the apples from going mushy and, more importantly, protects the crust you worked so hard to keep cold. Skip this step and you risk melting the butter in the dough before it ever hits the oven — and that means no flake.
Final Assembly
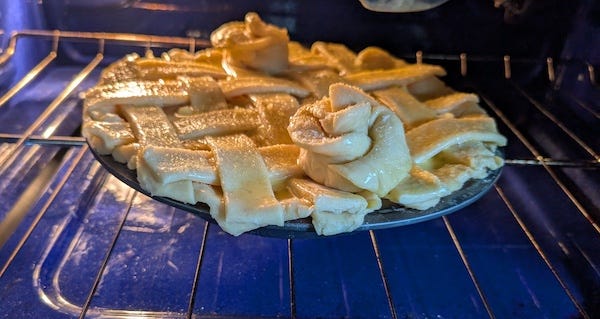
For the top, I went with a lattice crust. While the apples were cooking down, I took the other half of the dough, rolled it out, and cut it into strips about ¾" wide. Once the filling had cooled and I’d spooned it into the base crust, it was just a matter of weaving those strips over and under until I had a grid across the pie.
Pro tip: before laying down the lattice, dot the filling with ¼" cubes of butter. They melt into the apples as it bakes, adding richness and helping carry the flavors.
Lattice isn’t just for looks — it gives the pie structure, lets steam escape evenly, and shows off the bubbling filling underneath.
To finish it off, I brushed the lattice with an egg wash — one egg from my chickens, beaten with a splash of water — and sprinkled a little sugar over the top. That’s what gives you the golden crust with just the right crunch.
I also had a little fun with the top crust — added a couple of dough flowers for decoration. Still learning, but that’s half the fun. Cooking isn’t just survival, it’s also craft.
The Bake
Now it’s time to make things happen — until it’s baked, it’s just a pan of dough and fruit. The oven is where it becomes pie.
First step: preheat to 350°F. While the oven comes up to temp, slide the assembled pie back into the fridge. Keeping it chilled at this stage locks in the structure — cold dough hitting hot air is what gives you that flake.
When the oven’s ready, slide it onto the middle rack. That’s where the heat stays balanced, so the bottom crust bakes through without burning and the top turns golden at the same pace.
Bake for about an hour and a half, rotating halfway through to even out any hot spots. You’ll know it’s done when the filling bubbles through the lattice and the crust is evenly golden.
So I learned a lesson here: put the pie on a sheet tray to catch drips. Burnt sugar on the oven floor is a nightmare, and it sets off the smoke alarm. Once was enough for me. On my next bake, that tray goes under the pie before it goes in the oven.
Pro tip: Put the sheet on a the lower oven tray, rather than directly under the pin tin so you keep an even airflow.
Cooling
As Tom Petty said, the waiting is the hardest part. You pull a pie from the oven and every instinct says cut in now, but that’s how you end up with a runny mess. The filling needs time to set as it cools, the starches finish thickening, and the flavors settle in.
I let mine rest on a wire rack for at least a couple of hours. Don’t stick it straight in the fridge — the sudden chill makes the crust tough and can cause condensation that softens it. Counter cooling keeps the crust crisp and the filling stable.
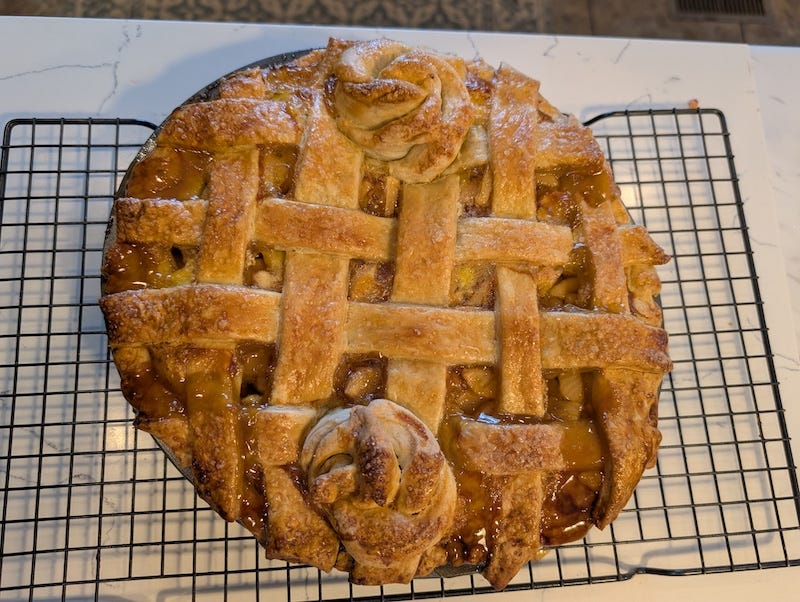
That’s the payoff right there — golden crust, bubbling filling, and the smell filling the whole house. It’s not factory-perfect, but that’s the point. Every crimp, every lattice strip, even the roses on top — they’re marks of a build done by hand.
The pie didn’t last long around here, and for good reason — flaky crust, balanced sweetness, and that orange zest gave it a pronounced twang that made it stand out from the usual apple pie.
Done, Not Delivered
The pie tasted great, sure. But not as good as the taste of learning a new skill. I didn’t wait for it, I didn’t pay a stranger to drop it at my door. I made it. And when we have apple trees out back, it’ll be even more homemade — One step at a time.
Maybe next time I’ll try a berry tart — though I’ll have to work out the custard chemistry first.
In the meantime, I’ve got to get back to Raspberry Pi projects on my shop bench.