
Chicken Coop automation revisited.
This time it's a Raspberry Pi Zero.

Back in 2020 I wrote a story about how I used a Arduino variation to automate the door on my chicken coop. I based this design on a Sparkfun Artemis RedBoard couple with a ESP8266 to provide network access. I even wrote simple IOS app to send REST requests to the controller. All that code is still up on GitHub and the controller is still running without to many problems.
My initial list of requirements and nice-to-haves included:
Open and close coop door on sunrise/sunset
Optional remote-control of coop-door
Daylight simulation to encourage egg production in winter
Monitor coop temperature for possible heater or vent control
Be somewhat resilient to power failures.
In retrospect I did accomplish all the items, and some of them were spot on, there were few things I wished I had done better:
Developing for Arduino especially the Cortex M4 Apollo3 is still a bit of a hack. The Arduino IDE isn't anywhere near professional grade, quite cumbersome and in some places fragile. The command line version isn't much better. You have to do a lot of setup to get things to compile. I suppose if you could get Clang to work with the Artemis RedBoard it would have huge potential.
As for hardware, I originally wanted to hardwire the coop connection but there was no Ethernet hat available that was compatible with the Artemis RedBoard. So I opted for hooking up Wifi using a ESP8266 on a serial port. The ESP8266 WiFi module API emulates something akin to the AT command set. Most of the libraries written for it are at best hobbyist quality and I ultimately had to write a state machine in C++ to simplify network communications. (See ESP8266Mgr and WifiParser.) The biggest drawback though is that the ESP8266 firmware can only listen on one TCP port at a time.
The good news was the core system was fairly cheap to build. The Artemis, ESP8266 and Qwiic shield combined can built for about $35.
Enter the Raspberry Pi
Lately I have been doing a lot of work with the RaspberryPi platform. The version 4 model B is quad-core Cortex-A72 (ARM v8) with built in Wifi, Ethernet, USB and HDMI. The Pi also comes with a number of GPIO lines that can be easily be configured for input or output, PWM, SPI, I2C and serial.
There are a number of operating system choices including the latest version of Debian GNU/Linux. This provides us a full fledged operating system modern development systems available as well as lots of drivers and documentation available.
The good news is that setting up a Raspberry Pi is fairly painless, and in about 30 minutes you can have it running over ssh and compiling C++ with a modern compiler. I have written a few notes on how I personally set my my systems.
The bad news is that so many people have been venturing into playing with Raspberry Pies that the supply cant come close to keeping up with demand and thus the price has skyrocketed over the past few months.
Raspberry Pi Zero
While I used the version 4 Pi as a proof of concept, when I revisited the bill of materials I realized that a much better choice for this project was the new Raspberry Pi Zero which is selling these days for about $15. The Raspberry Pi Zero 2 W is a quad-core 64-bit ARM and comes with the same GPIO as the regular Raspberry Pi, as well as 2.4GHz 802.11 b/g/n Wifi and Bluetooth 4.2 and BLE.
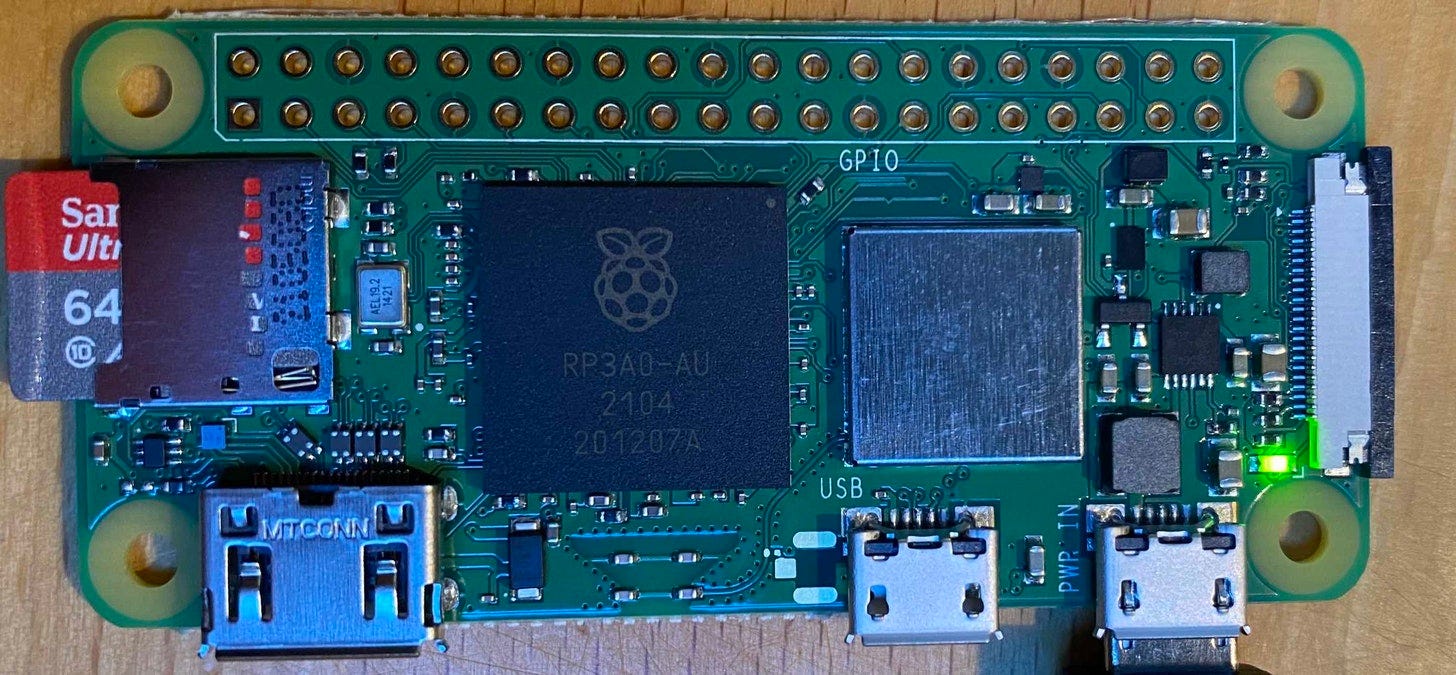
And while it the Zero 2W doesn't have built in Ethernet, it's fairly easy to connect an Ethernet controller over the SPI bus using the ENC28J60 Ethernet SPI Module for about $10 and a few jumpers.
If you don't want to do the wiring Waveshare even produces a hat that includes a couple of USB ports for around $15.
Interfacing the coop hardware
In my previous version of the coop I employed the I2C bus to hook up a set of Sparkfun Qwiic LED indicator buttons for manual control of the coop door; green for open and red for close. Not only did they give solid tactile feedback but since I could control the LED brightness and duty cycle. I was able to blink the LEDs while the door was in motion. I also used a TMP02 temperature sensor on the I2C bus to keep track of the coop temperature.
I found the simplest way to attach I2C devices to the Raspberry Pi was to use either a Qwiic SHIM or the Qwiic pHAT. The Qwiic Ecosystem made interfacing most sensors a was a matter of plug and play.
For this project, I chose to solder the Qwiic SHIM to the 40 pin header.
Controlling the Door.
I kept the same door actuator hardware in place from my previous project. In which I used a pair of the SPDT relays configured as a H-bridge to drive the Progressive Automations PA-14 Mini Linear Electric Actuator. The actuator motor will spin one direction or the opposite depending on which relay is activated. This is turn moves the coop door up or down.

For the relays I used KS0212 keyestudio RPI 4-channel Relay Shield. I want to also control a coop light to encourage egg production in winter as well as possibly an electric fence to discourage predators from entering the chicken pen at night.
The relay board was reasonably designed, except for a couple of minor issues:
The screw holes on either end of the board might interfere with wiring the relay if you chose to run posts through them.
It would have been nice to have the 40 pin connector include posts to allow another device stacked. By the way, the 3 channel board from waveshare got this correct.

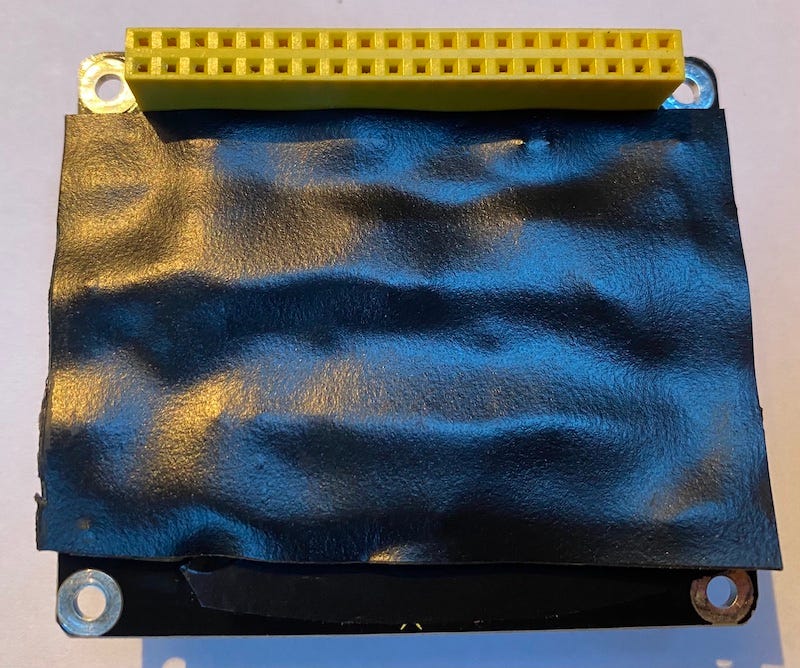
My only real concern is that the bottom of the relay board has exposed traces, which could potentially short against the Ethernet RJ45 connector in the card below it. This is easily addressed by using large piece of thick electrical tape on the bottom of the relay board as an insulator.
Building the prototype
I dug up a SanDisk microSD card and set the Raspberry Pi Zero and per my blog setup notes. Once I had the Pi configured, I assembled the stack of devices: the Pi Zero, Ethernet board, Relays and Qwiic buttons and the temperature sensor. We are ready to start our software design.

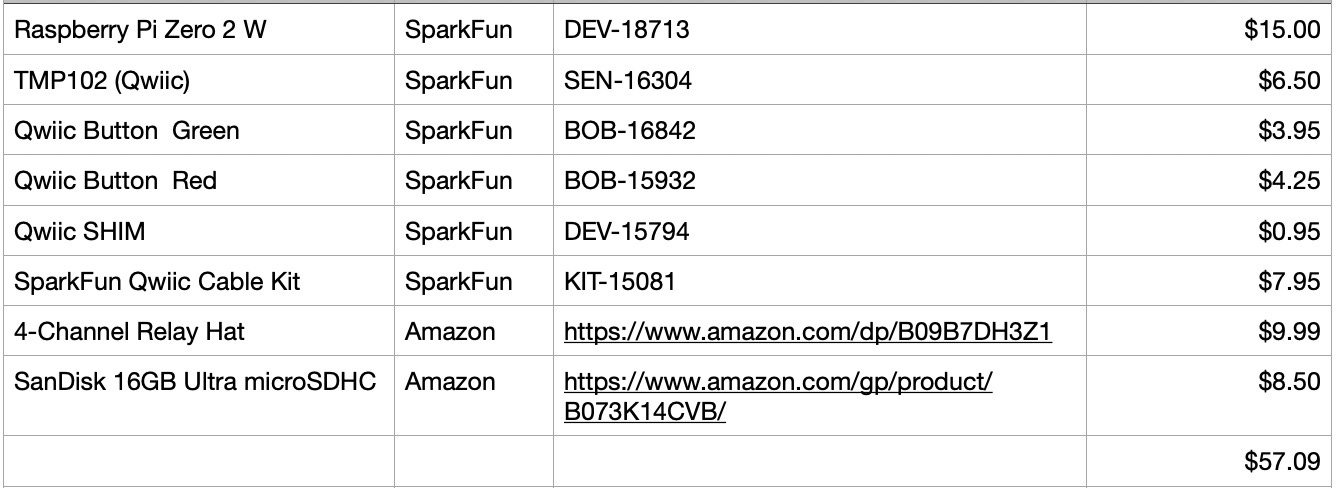
This is the bill of materials I am using for this prototype at Jan 2021 prices.
Coop Control Software
The software is split into two sections. The coop control server that runs on the Raspberry Pi Linux system and a remote control app that runs on the iOS mobile platform. Since interface to the remote is through a RESTful API it’s not a far reach to port the remote to anything else.
As with the original Arduino coop design, this coop server is responsible for:
Controlling the operation of coop door, light and aux relay.
Keeping track of time of day and calculating next sunrise/sunset
Scheduling when the door and light should change state
Tracking the coop temperature
Provide a method of remote access over the internet
I am also incorporating lessons learned, including:
Using a modern C++ 17 compiler. It’s indispensable for server design.
While the original RESTful API made it easy to write a remote control client app, I wanted to improve on it. Including adding a bit more security to prevent hacking the coop.
A good remote app removes the need for an LCD display on the controller.
It is prudent to recover from potential power failures by handling system restart in a failsafe manner. For example, we don't want it to open the coop door if power is restored in the middle of the night.
Since the Raspberry Pi is running a modern Unix system, I can focus on server design and I don’t have to write the network interface or protocol code like I had to for the Ardinuo. The network, GPIO, i2c stacks are already there and open sourced with lots of examples. Including ample tools for development and debugging.
The server code is based on my FooServer engine that I make available as open source. It’s basis for my other Raspberry Pi projects including my Insteon Server and Well Pump manager.
Building the server
I have made the chicken coop server sources are available on Github. You should follow my Pi Setup instructions and need to install Clang, CMake, Git sqlite3, gpiod i2c-tools and the raspberrypi-kernel-headers.
You can then clone the repository into a directory and build the project
# clone the repository
git clone  https://github.com/vinthewrench/chickencoop.git
cd chickencoop

#pull the submodules
git submodule update --init --recursive

#make the makefile
cmake .

#make the coopmgr
# this will take a few minutes.
make

# with any luck you will have the server in the bin directory
cd bin
ls -l
# you should see
# coopmgr
# coopmgr.props.json
# helpfile.txt
# valueschema.csv
Before running the server, you might want to edit the coopmgr.props.json file.
In particular you should set the following JSON values.
lat-long - a string with your latitude and longitude
api-key/api-secret - any username/password combo you want
Optionally you can set the rest-port and if you wish to allow telnet access.
There is a sample schedule already setup for opening and closing the door. It’s easier to set these up from the REST API
You will need to update the lat-long as a minimum since that is what is used to calculate sunrise/sunset values. To save some debugging time I strongly suggest you check the date and time on the raspberry pi, in particular the time zone.
Test the server
Just to test things out, you can delete the lines for api-key/api-secret from the coopmgr.props.json file. and start the server by running the coopmgr from the bin directory. You should get something similar to the following:
$ ./coopmgr
27.01.22 12:58:53	Start Coop
27.01.22 12:58:53	Log Start
27.01.22 12:58:53	READ valueschema: valueschema.csv
27.01.22 12:58:53	OPEN database: coop.db
27.01.22 12:58:53	Start TempSensor 1 - OK
27.01.22 12:58:54	RUN STARTUP EVENT 10d1 - "Startup event"
27.01.22 12:58:54	RUN EVENT 10d1 - "Startup event"
27.01.22 12:58:54	LIGHT ON
27.01.22 12:58:54	RUN EVENT 2d86 - "sunrise open door"
27.01.22 12:58:54	RUN EVENT 2d86 - "sunrise open door"
27.01.22 12:58:54	DOOR OPEN
27.01.22 12:58:54	RUN EVENT 52b9 - "morning light on"
27.01.22 12:58:54	RUN EVENT 52b9 - "morning light on"
27.01.22 12:58:54	LIGHT ON
27.01.22 12:58:54	RUN EVENT b290 - "morning light off"
27.01.22 12:58:54	RUN EVENT b290 - "morning light off"
27.01.22 12:58:54	LIGHT OFF
At this point the Rest API should be available on port 8081. ( In my case, I had already changed the server hostname from raspberrypi to pi8z)
I was able to make simple JSON queries using my browser:
http://raspberrypi:8081/state
{
 os.machine:"armv7l",
 os.nodename:"pi8z",
 os.sysname:"Linux",
 coopdevice:2,
 state:2,
 stateString:"Connected",
 version:"1.0.0 dev 2",
 os.version:"#1514 SMP Mon Jan 17 17:36:39 GMT 2022",
 buildtime:"Jan 27 2022 12:40:50",
 success:true,
 date:"Thu, 27 Jan 2022 21:03:05 GMT",
 cpuTemp:39.704,
 tempsensor1:2,
 os.release:"5.10.92-v7+",
 uptime:10
 }
http://pi8z:8081/date
{
 midnight:1643241600,
 longitude:-122.865947,
 gmtOffset:-28800,
 civilSunSet:1069.69631296677,
 latitude:42.235389,
 sunSet:1039.616221753528,
 success:true,
 date:"Thu, 27 Jan 2022 21:09:50 GMT",
 timeZone:"PST",
 sunRise:449.3924068215812,
 civilSunRise:419.3235617079116,
 uptime:415
 }
Testing the RestAPI
One of the best way to test the coopmgr is to use the PAW app to create REST queries. I have included a file titled coopserver paw.paw that describes the Rest API to PAW. You can use that to execute commands and see the decoded responses.
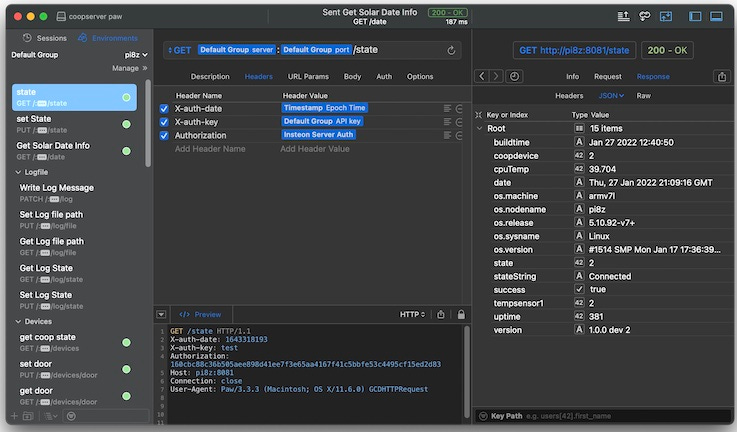
Once you have tested that it works, I suggest that you include a api-key and api-secret value to the coopmgr.props.json file and test that it works with PAW. There is some crypto there and you will need to install the PawExtensions I included if you wish to use the api-key.
The Remote App
As an experiment I wrote an iOS client for the original coop project using SwiftUI. Nothing too complicated, just an open and close button and a switch for the coop light. Not only did it turn out to be incredibly unreliable but within a year I wasn’t able to use or build a new copy it because Apple had changed so much in both the OS and the development system. SwiftUI is a joke. The same goes for Xcode 13. I have been developing software for about 45 years and I the last time I came across such a mistake was probably Forth.
Yeah OK Boomer… you just don’t know how to use it. Sure, have another Tide pod while I write some code that works.
So for this build, I was still willing to work with Swift, but I stuck to UIKit and went back to Xcode 12. At least it didn’t crash every other build.
To make the user experience simple, there is a lot hidden in this app. It does a good job of translating the expected iOS user experience into the needed REST api calls. Since I had zero interest in dealing with App Store and their ever changing policy issues (after developing on the platform for more than 10 years), I am providing you the sources for the new app are in the “chickencoop app” folder. You can build and deploy it for yourself. This also means that since I am not using Push notifications to track changes, the app needs to poll the coop server periodically to reflect any changes in coop state. Luckily this requires minimal network traffic, after all it’s just a chicken coop.
Here is a quick overview of what the app looks like:
The setup screen
This is where you enter your device address, rest port number and api-key and api-secret from the coopmgr.props.json file. Once connected the app will send you into the main screen. You can always click on the gear in the upper right hand to get back to this. Once connected, the arrow next to the status allows you to get some more details on the version and the clock settings on the server.

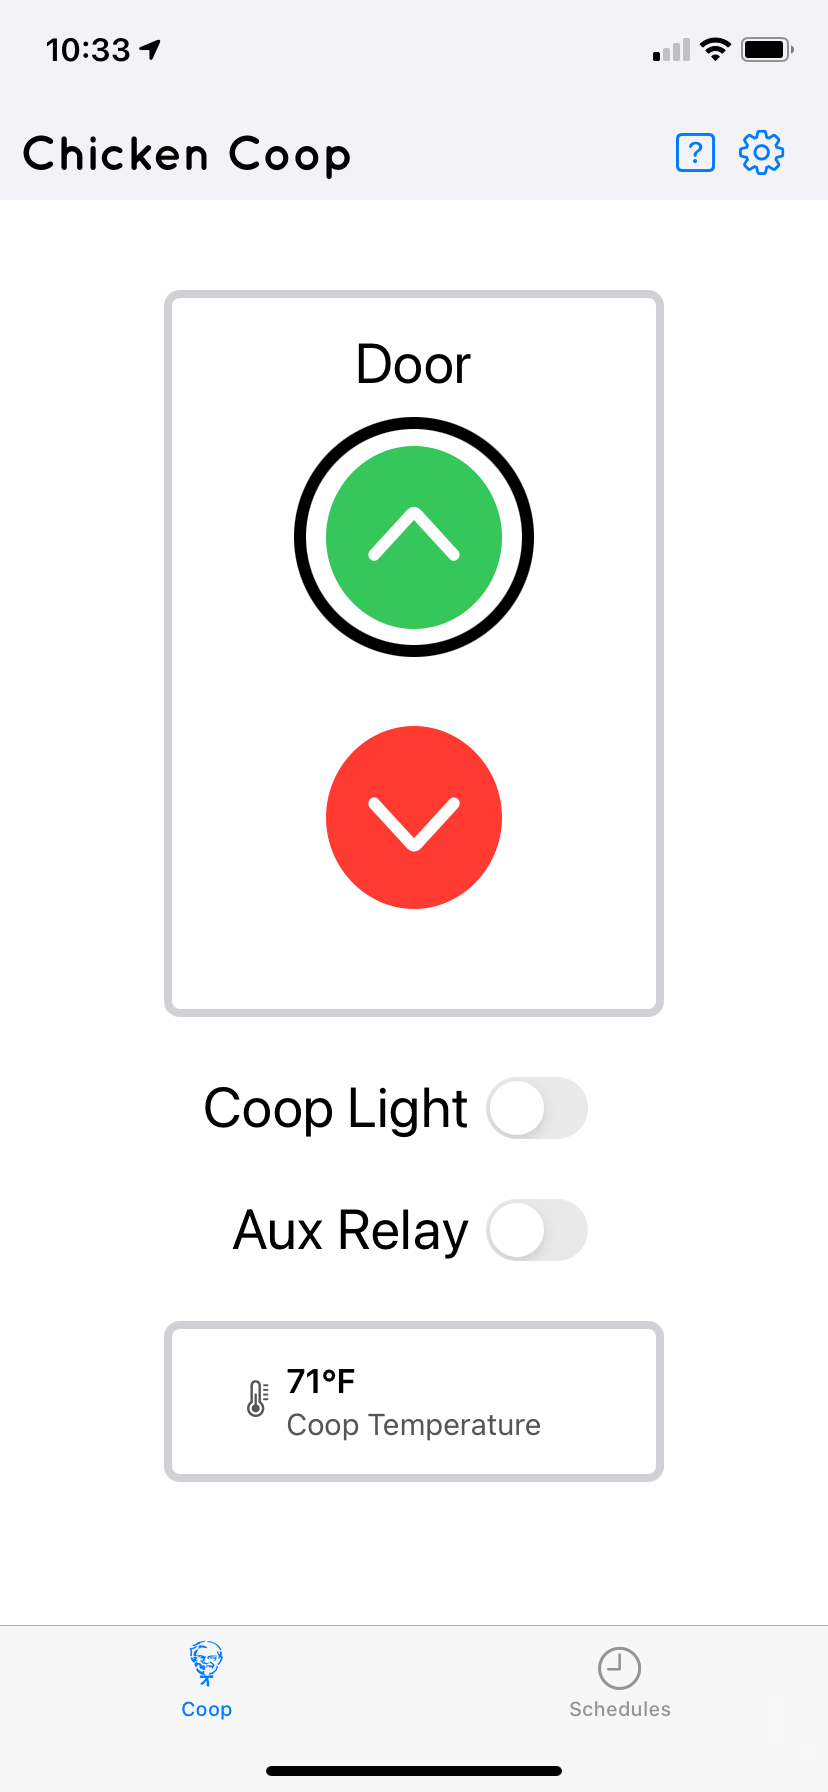
The main screen
You can observe the and set the status of the door, lights and aux relay as well as the temperature returned from the TMP02 sensor.
The coop schedule
You can modify and test the running coop schedule from here.

Unfinished issues
As of today, the prototype is sitting on my desk opening and closing relays on schedule and talking to the remote app. The original controller is still running the coop, but I plan to swap in the new one once the weather gets a bit warmer. This gives me time to work out a few more items in the design.
I really want to handle power failures a bit better. We get them here, and I suspect that it’s only going to get worse as we continue to load the power grid.
While I am working on a simple UPS to power the pi and the actuator, I would still like to be able to shutdown when not needed when running on battery backup and maybe restart when the next event is due to happen.
I already have code running on the server that will reconcile any timed events for a given the time of day and set the relays into the proper state on startup. One failing of the Raspberry Pi is the lack of a built in battery backed Real Time Clock that the system could query when internet access is unavailable. There are a number of options available, and I will most likely have that working before I replace the old controller.
This has been a fun project and I will try to write a few more posts on the inner workings of the code. I already use a lot of the code on other projects here and will most likely improve on it for a few more projects I have up my sleeve in the future.
I was having some noise issues with I2C please see how I addressed it here: https://vinthewrench.substack.com/p/dealing-with-i2c-noise-on-raspberry?utm_source=url