
Building a Dedicated Weather Station Display
A Raspberry Pi Build from Idea to Completion

In the previous article, we built an off-grid weather station. It’s now up and running, feeding data to Weather Underground and Windy, and accessible remotely through a Cloudflare tunnel.
With the data side dialed in, it was time to deal with what motivated this project in the first place: replacing that damned Ambient Weather display in the kitchen. It had brutalism and bought-on-sale-at-Home-Depot written all over it. Yes, it works, but it really doesn’t belong in our country home.
This isn’t about building a better weather interface than Ambient’s. User interface design is subjective, and arguing about it misses the point. The real goal was making something I control, and works the way I want.
This display doesn’t care what it shows. You can point it at weather or something else you built. It’s just a web browser.
That said, you’d think that building a display with a Raspberry Pi would be easy. Something you could just cookbook from the Internet. It has only one job: display a single HTML page and have the sense to go dark at night, and come back in the morning.
Someone must have done this already?

But No!
All I could find were bloated ecosystems like Home Assistant or MagicMirror, built around constant updates and expanding integrations. Spend a few minutes in r/homeassistant and you’ll see the steady stream of complaints about breaking changes and maintenance fatigue.
I’ve spent enough time cleaning up after someone else’s well-intentioned updates to know better than to sign up for that crap again.
The closest thing I found to what I wanted was Jeff Geerling’s pi-kiosk project. It’s clean, well-documented, and practical. It came closer than anything else, but still stopped short of my mark. Jeff’s approach starts from a full operating system and builds a kiosk inside it.
Instead, I went the other way. I started with a minimal base and added only what I needed. Simplicity buys you security and reliability.
The Display as an Appliance
I’m building an appliance, not a computer. It does one job: display a web page. All user interaction comes from whatever the page itself provides through the touch screen. There’s no desktop, no app ecosystem, no monthly update cycle, and no API churn waiting to break things.
It needs to run day in and day out without constant attention.
Every extra layer is another thing that can fail. That’s why this is a frame-up build. I know exactly what’s there, because I put it there. When you pull the trigger, it goes bang every time. End of story.
With that rant out of the way, let’s get into the details.
The Nuts and Bolts
For this project, I’m using a Raspberry Pi 4. The Pi 5 doesn’t buy me anything here except more heat and power draw. The Pi 4 is stable, readily available, and inexpensive enough that I can keep spares and chuck the dead one if it ever fails.
At current retail pricing, a 2 GB Raspberry Pi 4 goes for roughly $40–$50.
With Chromium doing the HTML rendering, a 2 GB Pi has plenty of headroom without paying for memory that will just sit idle. I suspect even a 1 GB model would run, but it would be a tight fit.
That said, the only reason I am using a 4 GB model, is that I salvaged it from an old water cistern project, not because the kiosk needs it.
Start with a Bare Frame
The plan was to start with a minimal, headless, command-line–only system and add just enough graphics support to run Chromium, and nothing more. For that, I wanted the X display system. X is mature, well understood, and has decades of mileage. In a single-window setup like this, it will work just fine, with no surprises.
I started by hunting down the 64-bit version of an older Raspberry Pi OS Bookworm Lite. It’s buried in the Raspberry Pi Imager, and you have to dig for it. I specifically didn’t want the newest release, Trixie.
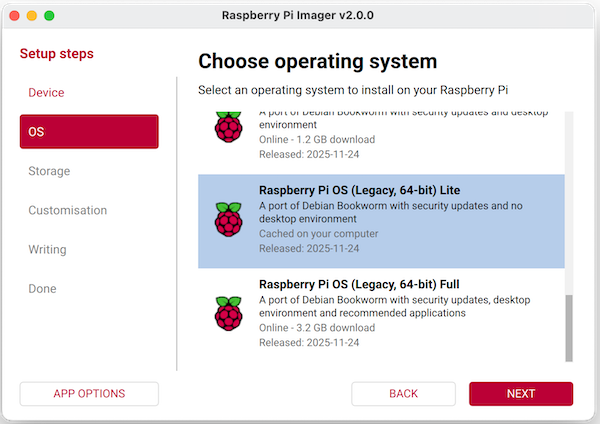
I could have started from Trixie Lite and installed X manually, but Bookworm Lite is a known quantity with X. Trixie is designed around Wayland.
I didn’t want to complicate things like screen blanking, focus, and startup behavior. I already knew how to control those reliably with X.
Dropping in the Engine
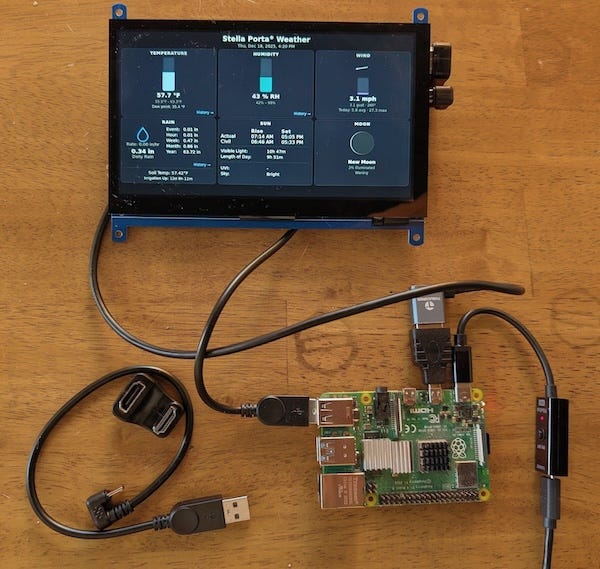
For the initial build, I used a Waveshare 7-inch HDMI LCD as a known-good display, with both the HDMI and touchscreen interfaces connected to the Pi. I considered some display and enclosure choices, but to get things up and running, this was the shortest path.
As usual, I setup Wi-Fi credentials and my SSH key in the Raspberry Pi Imager, flashed the SD card, dropped it into the Pi, and powered it up.
During boot, the usual Linux console messages scroll by on our display, and the system eventually lands at a login prompt.
That’s expected. At this point it’s still a stock Linux system. The display works as a console, but nothing has been done yet to turn it into a kiosk.
Next, I logged in over SSH, verified everything was working, and ran the usual update, upgrade, and reboot to make sure the system was fully up to date before dropping in the graphics stack:
sudo apt update
sudo apt upgrade -y
sudo reboot
Once the system booted back up, I logged in again over SSH and edited /boot/firmware/config.txt so it looked like this:
arm_64bit=1
disable_overscan=1

dtoverlay=vc4-kms-v3d
max_framebuffers=2
disable_fw_kms_setup=1

hdmi_group=2
hdmi_mode=87
hdmi_cvt 1024 600 60 6 0 0 0
hdmi_drive=1

hdmi_force_hotplug=1
Instead of letting the firmware guess, I forced the kernel to take control of the display the way I wanted:
Disabled overscan which removing unnecessary black borders, this is not a TV set.
Loaded the modern graphics driver.
Hard-coded the HDMI timing as per the Waveshare Wiki.
Forced HDMI up even if the panel is slow to respond at boot.
Then one more reboot, just to make sure I hadn’t broken anything.
With the bare frame in place, it was time to drop in the engine. As I mentioned above, we are using X and Chromium. We will need to install":
X server – The display and input plumbing Chromium needs to run.
Openbox – A minimal window manager that hosts Chromium without desktop clutter.
Chromium – the kiosk application itself, responsible for rendering the dashboard and handling touch input.
dbus-x11 – provides the message bus X applications like Chromium expect at startup.
unclutter – hides the mouse pointer when idle to keep the screen clean.
x11-xserver-utils – utilities for controlling display behavior like Display Power Management Signaling (DPMS) and screen blanking.
x11-utils – basic X diagnostic tools used to verify display state and configuration.
The installation command looks like this:
sudo apt install \
  xserver-xorg \
  xinit \
  chromium \
  unclutter \
  dbus-x11 \
  x11-xserver-utils \
  x11-utils

sudo reboot
Console Autologin and Controlled X Startup
Even with X and Chromium installed, nothing magical happens on boot yet. The Pi still comes up at the console, just like any other Linux box. We need to do a couple more things to make the magic happen.
First off we need to enable console autologin so after boot the system logs itself in and keeps moving instead of stopping at a prompt.
sudo raspi-config
# System Options → Auto Login → Console Autologin
Once the console session starts automatically on the primary terminal we can wire X to start automatically. But only on the console attached to the display. I don’t want X to ever try to start during an SSH login.
We can fix this, by adding appending the following to~/.profile:
if [ -z "$DISPLAY" ] && [ "$(tty)" = "/dev/tty1" ]; then
  startx
fi
Launching Chromium
With the system booting, logging in, and starting X automatically, the next step was to launch Chromium and point it at the weather page.
X reads ~/.xinitrc at startup, so this file controls exactly how the display session is launched.
Create the file so it reads:
#!/bin/sh

##. add this line for  the waveshare HMI screen
#xrandr --output DSI-1 --transform 0.85,0,0,0,0.85,0,0,0,1 --panning 1280x800

# Disable X screensaver and DPMS timers
# (keep DPMS enabled for manual force on/off)

xset dpms 0 0 0
xset s off
xset s noblank
xset s 0 0

# hide the mouse
unclutter -idle 0.1 -root &

# Launch Chromium in kiosk mode and restart it if it exits
while true; do
 sync
 rm -rf /tmp/chromium-kiosk

 dbus-launch --exit-with-session chromium \
      --user-data-dir=/tmp/chromium-kiosk \
      --kiosk \
      --start-fullscreen \
      --app=http://weather \
      --no-first-run \
      --no-default-browser-check \
      --disable-session-crashed-bubble \
      --disable-infobars \
      --noerrdialogs \
      --disable-features=TranslateUI \
      --disable-features=InfiniteSessionRestore \
      --disable-background-networking \
      --disable-background-timer-throttling \
      --disable-renderer-backgrounding \
      --disable-extensions \
      --overscroll-history-navigation=0 \
        --force-device-scale-factor=1 \
        --disable-font-subpixel-positioning \
        --disable-lcd-text \
        --disable-skia-runtime-opts
        --disable-backgrounding-occluded-windows \
        --disable-preconnect \
        --disable-features=NetworkService
        --disable-sync  \
        --disable-translate \
        --disable-component-update       \
        --disable-password-manager-reauthentication     \
        --disable-save-password-bubble  \
        --disable-autofill

    sleep 5
done
Make sure to make the file executable:
chmod +x ~/.xinitrcThis xinitrc above does a bunch of important things:
Disables X screen blanking and X-managed power saving, allowing display power control to be handled explicitly via scripts.
Hides the mouse cursor so it never appears on the kiosk display.
Runs Chromium in fullscreen kiosk mode with all browser UI suppressed.
Prevents background services, extensions, and prompts from interfering.
Starts Chromium in a clean state and restarts it automatically if it exits.
As many other things as I could get away with..
At this point, reboot the system one more time. After a few seconds, X should start automatically and Chromium should come up in fullscreen kiosk mode showing the “Example Domain” page.
“example.com” is the Internet’s documentation and testing domain. Its an easy way to confirm the entire boot path is working end to end. Once you’ve verified that, replace this URL with the address of your weather system.
Finishing Touches
If you’ve made it this far, good on you. The system is up, it’s stable. You’ve done magic! But before taking a victory lap, there are a few practical details worth addressing.
Display Power Control (Night Off / Morning On)
The first thing you’ll notice if this lives in your kitchen is that the screen never goes dark. Unless you want one more glowing rectangle lighting the room all night, you’ll want explicit control over when the display turns off and back on.
Skip firmware-level HDMI blanking. It’s unreliable and often doesn’t wake cleanly. Let X handle it. The cleanest approach is xset, using two small scripts to turn the display off at night and back on in the morning.
These scripts can live anywhere, as long as they’re executable and you know where they are. I keep simple helper scripts like this in ~/bin/ so they’re easy to reference later, especially when scheduling them with cron.
#create a directory for the scripts

mkdir -p ~/bin

# Create the night-time blanking script

cat > ~/bin/display-night.sh <<'EOF'
#!/bin/sh
DISPLAY=:0 xset dpms force off
EOF

# Create the day-time wake script

cat > ~/bin/display-day.sh <<'EOF'
#!/bin/sh
DISPLAY=:0 xset dpms force on
EOF

#Make both scripts executable

chmod +x ~/bin/display-night.sh
chmod +x ~/bin/display-day.sh
The important detail here is DISPLAY=:0. That tells xset which X session to talk to. Without it, nothing happens.
Before automating anything, test these manually from an SSH session:
~/bin/display-night.sh
~/bin/display-day.sh
If the screen goes dark and wakes up cleanly, you’re good.
Scheduling with cron (correctly)
Once you’ve confirmed the scripts work, the next step is getting them to run automatically at the times you want.
To do that, edit the user’s crontab. This is where per-user scheduled jobs live, and it’s the simplest way to run these scripts at specific times.
crontab -eHere’s an example schedule that turns the display off at 9:30 PM and back on at 6:30 AM:
30 21 * * * DISPLAY=:0 XAUTHORITY=/home/USER/.Xauthority /home/USER/bin/display-night.sh
30 6  * * * DISPLAY=:0 XAUTHORITY=/home/USER/.Xauthority /home/USER/bin/display-day.sh
A few details here matter.
Cron does not run inside your login session. When a cron job fires, it doesn’t inherit your shell environment, your display, or your X session. It starts with almost nothing.
That’s why the full paths and extra variables are spelled out in the crontab entry.
DISPLAY=:0 tells the script which X server to talk to. Without it, xset has no idea which display you mean.
XAUTHORITY=/home/USER/.Xauthority tells X that this job is allowed to control that display.
/home/USER/ is the user’s home directory. Replace USER with your actual username. If you’re not sure what that is, run
pwdfrom a terminal and use the path it prints. Cron does not expand shortcuts like~or search your interactive shell’s PATH, so everything needs to be written out explicitly
If you leave any of this out, the job will still run, but it will quietly do nothing.
Once this is in place, the display turns itself off at night and comes back on in the morning without user interaction, background loops, or firmware tricks.
Incidentally, It’s cron not chron..
An old guy with a beard told me it meant “Command Run ON”.
cron is not named after Chronos, the God of Time, but rather Cronus, the King of Titans, Keeper of the Old Order. The Root UNIX Scrolls tell of an eventual age when order will be overthrown in the world, and the regularity that is overseen by cron will crumble with it. When the Greeks wrote Titanomachy, they were foretelling the Fall of UNIX without knowing it.
Wi-Fi Hardening
If this kiosk is using Wi-Fi, there’s one more thing worth fixing.
Out of the box, Wi-Fi power saving is enabled. That’s fine for laptops and phones, but it’s a bad fit for an unattended display. Power saving can introduce latency, cause dropped connections, or leave the system slow to reconnect after idle periods.
For something that’s supposed to stay connected and just work, it’s better to turn it off.
You can disable Wi-Fi power saving immediately with:
sudo iw dev wlan0 set power_save offThat change takes effect right away, but it won’t survive a reboot. To make it stick, the simplest approach is to wrap it in a small systemd one-shot service that runs at boot.
Create the service file:
sudo nano /etc/systemd/system/wifi-powersave-off.serviceAdd the following:
[Unit]
Description=Disable Wi-Fi power saving
After=network.target

[Service]
Type=oneshot
ExecStart=/sbin/iw dev wlan0 set power_save off

[Install]
WantedBy=multi-user.target
Enable it:
sudo systemctl daemon-reload
sudo systemctl enable wifi-powersave-off.service
From that point on, Wi-Fi power saving stays disabled across reboots. The connection remains stable, and the kiosk doesn’t quietly fall off the network.
If you’re using Ethernet instead of Wi-Fi, you can skip this entirely.
SD Card Wear (A Brief Reality Check)
I’ve seen SD cards used in plenty of lower-end kiosks, especially in Pi-based signage, dashboards, and other single-purpose displays.
An always-on kiosk will eventually wear its storage, and browsers are usually the reason. Left unchecked, Chromium will generate constant writes from caches, session state, and background activity.
We try to avoid that problem here by keeping Chromium’s profile in RAM. Its cache and session churn never touch the SD card, and when the browser restarts it comes back clean, without accumulated state.
Once the browser is out of the equation, disk writes drop to a trickle. System logs and the occasional configuration change don’t meaningfully stress the card.
From here, the tradeoff is straightforward: use a decent SD card and treat it as replaceable, or start cutting writes further to extend its life. The second option works, but it also makes the system harder to change and debug.
Premature optimization is the root of all evil.
- Donald Knuth
How Much Pi Does This Eat?
The goal here wasn’t how much hardware I could throw at a problem. It was how little I could get away with and still end up with an attractive display. I was curious about I can get away with.
Earlier, I said a 2 GB Pi 4 would be more than enough for this. Let’s prove it.
After the system had been up and running for a few hours, I checked memory usage:
$ free -h
Mem:  7.6G total | 437M used | 6.7G free | 596M cache
Swap: 511M total | 0 used
About 437 MB is in use. That includes the kernel, the X server, Chromium, and the web application running inside it. On a system with multiple gigabytes available, that is barely making a dent.
The uptime output tells the same story from a different angle:
$ uptime
12:50:22 up 4:21, 2 users, load average: 0.06, 0.02, 0.00
On this Pi, a load average of 1.0 means one CPU core is fully busy. Numbers well below that mean the CPU is mostly idle. Here, all three values, covering the last 1, 5, and 15 minutes, are close to zero.
It’s not doing much: Chromium runs, the display updates, touch input is responsive, and then the CPU goes right back to waiting.
The “2 users” are just me logged in over SSH and the local display console running Chromium.
So yes, a Pi 4 is massive overkill for this job, it not even breaking a sweat. The next question was how far down the ladder I could go before it stopped working.
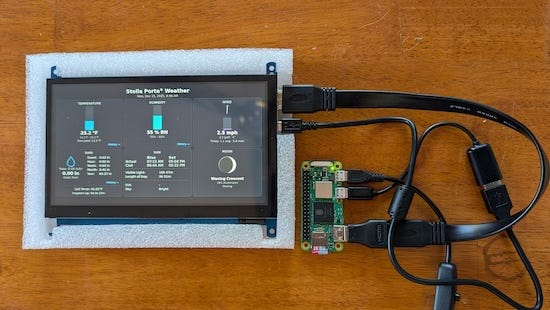
Running on a Pi Zero 2 W
I took out a fresh Pi Zero 2 W, dug up the proper cables for the HDMI display, and booted it using the same SD card I had been running in the Pi 4.
The kiosk ran better than you might expect. Running the page, it settled at about 196 MiB of RAM used out of 416 MiB available. Not roomy, but not the dumpster fire people like to assume either.
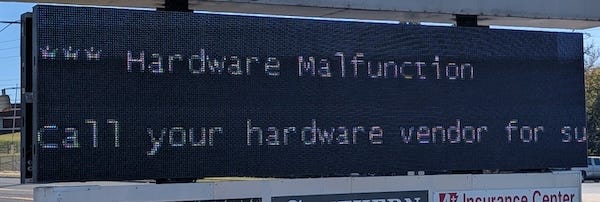
From a functional standpoint, the kiosk does its job. But at startup Chromium displayed a low-memory warning dialog. That dialog completely breaks the kiosk model, because any dialog that requires user interaction might as well be a kernel panic in an unattended system.
I tried a few ways around it short of doing a custom Chromium build, but didn’t get anywhere quickly. Making it work on a Pi Zero 2 W wasn’t important enough to keep pushing, so I moved on.
What I learned from this exercise is that a Pi Zero 2 W can drive the display, but it’s right on the edge. A Pi 4 has plenty of margin, and that margin matters more than proving a point.
Choosing a Display
I built and tested three complete systems using different display options before settling on a final design:
Raspberry Pi Touch Display 2
7-inch diagonal, 800×480 resolution, DSI interfaceWaveshare PI5-HMI-080C
8-inch diagonal, 1280×800 resolution, DSI interfaceWaveshare 7-inch HDMI LCD (C)
7-inch diagonal, 1024×600 resolution, HDMI interface
The real difference between them comes down to the display interface. DSI, or Display Serial Interface, is meant for directly attached panels. It’s the kind of link used inside phones, tablets, and laptops, where the display is treated as part of the system. The panel is assumed to be known in advance, with fixed timing and geometry. When everything lines up, it works well, but there’s very little room for error.
HDMI takes the opposite approach. It’s designed for external displays. The panel describes itself to the system at startup, negotiates timing, and reports its resolution and physical characteristics through EDID. The OS doesn’t need to know anything about the panel ahead of time.
HDMI won for a very practical reason: I couldn’t get Chromium to reliably display the web page over DSI without a lot of fussing. The DSI setups worked when everything was exactly right, but they were fragile and easy to knock out of alignment.
That said, the DSI displays were further along as packaged products. They came with enclosures and mounting hardware and assumed the Raspberry Pi would live directly behind the panel as part of a single, integrated unit.
The Waveshare 7-inch HDMI LCD takes a more modular approach. Video comes in over HDMI, with touch and power handled separately over micro-USB. Everything terminates on a controller board mounted directly to the panel, with the connectors sticking straight from the side. Unlike the PI5-HMI-080C, this is just a bare LCD and driver board. Fabricating a case is up to the maker, although there are some STL files floating around online.

I’m not a fan of resin 3D prints. They tend to look like toy-aisle junk, especially for something that’s going to live on a wall. I’ll be fabricating a proper hardwood frame instead.
In either case, the straight-out connectors force some clever mechanical design. Whether you’re printing plastic or building wood, careful layout is required to keep everything compact. A U-turn HDMI adapter folds the cable back parallel to the panel instead of sticking straight out, and a U-turn USB adapter does the same for the touch and power connection.
Mechanically, the HDMI option required more work. Electrically and in software, it was far more predictable.
Why the HDMI Display Looked Better
You would expect both DSI panels to look better than the 7-inch HDMI display because they have more pixels. In use, the opposite was true.
The HDMI display consistently looked sharper and more accurate. Text was crisper, edges were cleaner, and nothing appeared cropped or scaled. The higher-resolution DSI panels looked softer, despite having more pixels on paper.
The reason comes down to how the system learns what the display actually is. HDMI panels describe themselves to the system through EDID, reporting their resolution and physical size so the OS and Chromium can compute DPI and scaling correctly. The DSI panels did not provide that same level of self-description, which left the system guessing. That guess was slightly wrong, and the result showed up as scaling and softness on screen.
A Note on DPI and Small HDMI Panels
One small detail showed up once I started digging into the Waveshare 7-inch HDMI display. The physical size it reported to the system didn’t make sense for a panel that small. After chasing it down, it became clear that the EDID wasn’t coming from the LCD glass at all. It was coming from the HDMI controller board attached to the panel, using a hard-coded EDID blob that didn’t match the actual display.
Checking from the command line made the problem obvious:
DISPLAY=:0 xdpyinfo | grep -B2 resolution
dimensions: 1024x600 pixels (270x158 millimeters)
resolution: 96x96 dots per inch
Based on the EDID data, the display was treated as 270×158 mm. The Waveshare datasheet lists the actual active display area as 154.21×85.92 mm. In other words, the panel was treated as roughly 1.8× larger than it really is, cutting the computed DPI almost in half.
Fixing it was straightforward. Overriding the reported physical size and rebooting was enough to straighten it out:
# /etc/X11/xorg.conf.d/10-monitor.conf
Section “Monitor”
    Identifier “HDMI-1”
    DisplaySize 150 90
EndSection
This doesn’t change resolution. It corrects the DPI calculation so text and layout are rendered at the proper physical scale.
A Note on Waveshare LCDs
I ended up with several Waveshare 7-inch HDMI LCD (C) panels sourced from different places. Panels bought directly from Waveshare included stands and mounting hardware. Panels bought through Amazon did not. It turns out Waveshare sells multiple bundle variants, and resellers often strip accessories or sell panel-only kits.
That difference raised a red flag at first. Anyone who’s dealt with auto parts or commodity electronics knows the counterfeit market among Chinese OEMs and resellers is large, well-established, and relentless. Small LCD panels are no exception.
Knockoff and clone panels do exist, and they usually give themselves away quickly. Broken or missing EDID data, odd timing modes, incorrect physical dimensions, or flaky HDMI behavior are all common tells.
If you want to sanity-check a panel, HDMI makes it easy. A genuine Waveshare panel presents a clean EDID, advertises a native resolution of 1024×600, and reports a physical size consistent with a 7-inch display. On a running system, you can use the X11 utilities to inspect what the panel is actually advertising over HDMI:
DISPLAY=:0 xrandr --verboseWhat you want to see is boring output: a stable HDMI connection, a preferred mode of 1024×600, sane timing values, and a readable EDID block. I saw none of the usual red flags here. Panels from different sources behaved identically and reported the same display characteristics.
Dialing in display quality
From that point on, the remaining polish was entirely in the web page layout and typography, not the hardware or the display stack.
Getting the display to look right had very little to do with hardware and almost everything to do with abandoning browser-centric layout habits. Things like fluid layouts, rem-based sizing, fractional spacing, and trusting the browser to “do the right thing” are usually taught as best practice. That advice makes sense when you’re building resizable pages for screens with unknown geometry. On a fixed-resolution kiosk, it works against you and gets in the way of pixel-accurate rendering.
The biggest improvement came from eliminating fractional geometry altogether. I stopped using rems, switched everything to integer pixel sizes, and removed fractional margins anywhere near text. Font sizes like 28.8px or labels at 13.6px always looked slightly soft. The same text at 24px or 14px snapped into focus immediately. Bumping font weights helped as well, especially for small labels and numeric readouts.
Font choice was the last piece. The default system font rendered poorly on a Raspberry Pi driving a 7-inch HDMI panel, particularly for numbers. Switching to a better screen-friendly font like Inter and using WOFF2 files made the text noticeably crisper. I also limited the design to just two weights, regular and semibold, which helped eliminate the remaining blur around numbers and labels
Example CSS for a 1024×600 Kiosk
/* === KIOSK TUNING FOR 1024×600 === */
@media (max-width: 1024px) and (max-height: 600px) {

  body {
    font-family: “Inter”, system-ui, sans-serif;
    font-size: 16px;
    font-weight: 400;
    font-variant-numeric: tabular-nums lining-nums;
                           /* stabilizes numeric alignment */
    margin: 0;
    padding: 8px;
    overflow: hidden;
  }
}
What not to do on a fixed-resolution kiosk:
h1 {
  font-size: 1.5rem;      /* fractional in practice */
  margin-bottom: 0.15rem;
}
Do this instead:
h1 {
  font-size: 24px;        /* integer pixels */
  margin-bottom: 4px;    /* integer spacing */
  font-weight: 600;
}
On the Substance of Things

The goal here was to give our weather station a proper face, where layout, spacing, and weight matter as much as the numbers themselves. Every choice, from HDMI versus DSI to correcting DPI and snapping the layout to the pixel grid, was about how the information is formed on the screen, not how many bells or whistles it has.
The surprising thing was how much of the result came from details most people never notice. When the display reports its size correctly, when text lands cleanly on pixels, and when spacing is deliberate, the screen stops feeling like a random browser window and starts feeling like a thing, something composed and coherent, rather than merely assembled.
Maybe that’s always been true. Most of what we build won’t last, and much of it will be forgotten. But the act of shaping something carefully, of giving even a small object clarity and proportion, matters anyway. Not because it’s permanent, and not because it impresses, but because often making something well is its own justification.