
Raspberry Pi Internet of Things - part 12
Time Has Come Today

In the previous post of this series, I discussed how to use the devices and sequence components of the piotserver configuration file to automate actions. But I glossed over how to trigger your automation sequence to run at a particular time. Now it’s a good time to get into this topic.
Why did the chicken …
When I designed my original chicken coop project, one of the tasks I wanted to accomplish was to open the coop door at sunrise and let the chickens out, and then close it after sunset when the chickens returned to their roost.
I did not want to base sunrise and sunset on a light sensor, as I found it unreliable. We had been living on the north-facing slope of a hill and didn’t receive the best sun coverage. So, I decided it was better to calculate sunrise and sunset based on the time of day.
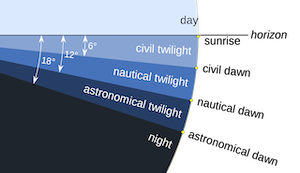
So, how do you calculate sunrise? Well, what do you mean by sunrise and sunset? Let’s review some terms. The period before the sun actually rises over the horizon, when there is enough light for you to see without assistance, is called twilight. The time when the first light occurs, marking the beginning of twilight, is called dawn.
As shown in the diagram above, there is more than one type of sunrise. However, farmers only care about two kinds: Civil Sunrise, which refers to the time when there is enough light to go outside and get work done, and Actual Sunrise, which is when the sun rises above the horizon.
We can use the Astronomical Algorithms by Jean Meeus to accurately calculate sunrise and sunset times, as well as the phases of the moon, based on the date and geographic location. While the math can be challenging, I was fortunate to discover some excellent code on Peter Buelow's GitHub page that performs this task well, and added it to piotserver.
Since the Raspberry Pi OS already ships with timedatectl for time synchronization, all you need to do to get piotserver to support sunrise and sunset to trigger sequences is to enter the latitude and longitude into the config file.
  "config": {
         "lat_long": "34.7465, -92.2608",
      },
Triggering Sequences
If you refer to the sequence example I outlined in the last article, you will notice a trigger entry with a timebase of sunrise.
 "sequence": [
    {
       "trigger": {
        "timeBase": "sunrise"
      },
      .....
While this is relatively self-explanatory, there is more to it. Sequences can be triggered in a few different ways.
Time-based events
Chronologically repeating
Application-based events
Ephemerally (one-time events)
Time-based events
By using a time-based event, we can program a sequence to fire off at a specific time each day, and even select which days of the week it will occur.
For example, if we wanted to trigger ten minutes before sunrise on the weekend, we could specify the following values to the timeBase, offset, and weekday JSON keys:
"trigger": {
        "timeBase": "sunrise",
        "offset" : -10,
        "weekday": ["Sat", "Sun"]
      },
The timeBase key accepts the following values representing an astronomical event:
sunrise
sunset
civil sunrise
civil sunset
The offset is optional and specified in minutes; the weekday is also optional and can be abbreviated or spelled out. (eg. “Wed” vs “Wednesday”)
We can also specify the actual time of day in terms of minutes from midnight, for example, if we wanted to trigger at 8 AM, which is 8 x 60 minutes = 480
"trigger": {
        "time": 480
      },
Chronologically Repeating Events
Another way to specify a trigger time is by using the “cron” key to schedule an event that repeats periodically. The concept of cron scheduling in Unix has been around as far back as I can remember. It’s a very powerful language that you can use to express when and how often you want events to occur. A cron expression is a string composed of six fields separated by a white space that represents a set of times that an event will repeat.
Here are some examples:
* * * * * *	        Every second
*/5 * * * * ?	        Every 5 seconds
0 */5 */2 * * ?	        Every 5 minutes, every 2 hours
0 */2 */2 ? */2 */2	Every 2 minutes, every 2 hours,
                           every 2 days of the week, every 2 months
0 15 10 * * ? *	       10:15 AM every day
I am using the croncpp library from Marius Bancila to convert the fields into a format that piotserver can understand. I suggest looking at his page to understand better how to form a proper cron string.
If you wanted the sequence to run hourly, you could use:
"trigger": {
        "cron": "0 0 * * * *"
      },
And yes, I, too, often find the encoding confusing, so I have created several alias strings to help the user.
@30sec
@minute
@10minute
@hourly
@daily
@midnight
@weekly
@monthly
@yearly
@annually
This allows you to specify a trigger using the alias
"trigger": {
        "cron": "@hourly"
      },
Incidentally, It's cron not chron..
An old guy with a beard told me it meant “Command Run ON”.
cron is not named after Chronos, the God of Time, but rather Cronus, the King of Titans, Keeper of the Old Order. The Root UNIX Scrolls tell of an eventual age when order will be overthrown in the world, and the regularity that is overseen by cron will crumble with it. When the Greeks wrote Titanomachy, they were foretelling the Fall of UNIX without knowing it.
Application-based events
I also support triggering a sequence in response to a server event. Currently, I support startup and shutdown, but this will likely expand in the future.
"trigger": {
          "event": "startup"
      }
I find this helpful in making sure that valves and motors are shut off when the system is shut down.
"trigger": {
          "event": "shutdown"
      }
Ephemeral events
I also mentioned Ephemeral (one-time events). These are sometimes used internally when the code needs to schedule an event to occur in the future, but only once. They are not available through the configuration interface.
We are out of time
I will discuss this further in a later article, explaining how we can set conditions to prevent sequences from running. I am currently investigating the concept of allowing a sequence to be triggered based on a user-supplied expression. For example, when a sensor value evaluates to true.
In the meantime, consider the following video, recorded back in January 1969. These guys were way ahead of their time.
This post is part of the Off-Grid Farm Automation with Raspberry Pi series — a full DIY walkthrough of building a self-hosted system for sensors, valves, and automation, no cloud required.