Raspberry Pi Internet of Things - part 11
How to make things happen automatically
In a previous post, I discussed how to inform the piotserver about the devices you would like it to recognize and control using the REST API. However, the system only becomes truly useful when we can make the devices run automatically.
Trigger and Action
I began experimenting with ways to script events when I started the original chicken coop project. For instance, with our chicken coop in Oregon, I would turn on a light in the coop at 6:00 AM to encourage egg laying, then open the coop door at sunrise. The door would close again at sunset, and shortly afterward, the electric fence would activate to deter predators.
Chicken Coop Door example
I learned a bunch of lessons from automating the chicken coop, and this system served me well for several years. However, since relocating to Arkansas, I now face different challenges related to our farm’s automation needs.
It was time to up our automation game. What I didn’t want to do was to hardcode the scheduling system in a scripting language. Rather, I found that after some prototyping, I could express most farm automation tasks in terms of events that trigger a sequence of actions.
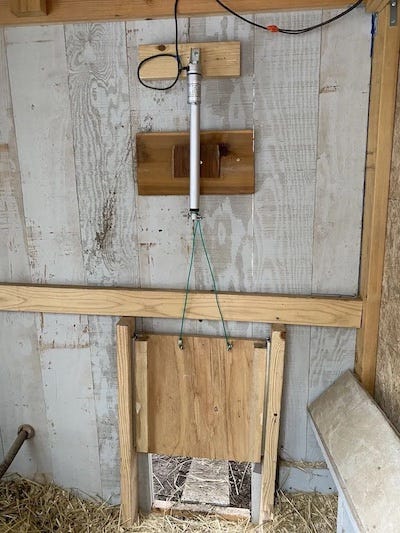
That said, here is how I would do the chicken coop door using the piotserver framework. We start with the door actuator device that I described in the previous article. We programmed it to react to changes in the variable called DOOR_1. The door is on a slider and is connected to the actuator through a cable, so that when the actuator retracts, the door opens.
To automate the opening at sunrise and closing at sunset, we add the following JSON sequence entry to the piotserver configuration file.
 "sequence": [
    {
      "sequenceID": "2000",
      "name": "sunrise open door",
      "trigger": {
        "timeBase": "sunrise"
      },
      "steps": {
        "action": {
          "cmd": "SET",
          "key": "DOOR_1",
          "value": "0"
        }
      }
    },
    {
      "sequenceID": "2001",
      "name": "sunset close door",
      "trigger": {
        "timeBase": "sunset"
      },
      "steps": {
        "action": {
          "cmd": "SET",
          "key": "DOOR_1",
          "value": "1"
        }
      }
    }
  ]
This does the following:
At sunrise, set the DOOR_1 value to false, which tells the ACTUATOR device to retract, thereby pulling the cable up and opening the door.
At sunrise, set the DOOR_1 value to true, which tells the ACTUATOR device to extend, thereby lowering the cable and closing the door.
Irrigation System as an Example
While the farm irrigation system shares many similarities with the coop regarding scheduling devices, it’s a lot more complex than opening and closing a door.
Initially, I attempted to meet our needs using the OpenSprinkler platform. And as much as I am a huge fan of Ray Wang’s work, I quickly discovered that our garden/farm needs a little more functionality than what that platform offered. So we built our own. Instead of going into too much detail, let's begin with a simple example first.
The basis of my system uses a Raspberry Pi Zero W with its GPIO lines connected to a Waveshare 8-Channel Relay Expansion Board. See part 2 of this series,
Four of the relays, RELAY_1 to RELAY_4, are connected to in-line automatic sprinkler valves that feed water to Plot A through Plot D. (There are actually more than four, but let's keep it simple for now.)
At a specified time, the valves for Plot A open and run for a predetermined period, then shut off. This is followed by the valves for the next plot, which open, and so on. If sufficient rain is detected, the sequence is halted till the next time.
Setting up the Relays
We’ll start by setting up a configuration file for piotserver with a device entry for the GPIO Waveshare relay board. Four of the relays are set up for output. I have also disconnected the jumper from the board for relay number 7, configuring that pin as an input and wiring it to a hygroscopic rain sensor.
So far, the config file looks like this:
{
  "devices": [
    {
      "title": "RPi Relay Board",
      "device_type": "GPIO",
      "pins": [
        {
          "BCM": 5,
          "data_type": "BOOL",
          "gpio.mode": "output",
          "key": "RELAY_1",
          "title": "Plot A"
        },
        {
          "BCM": 6,
          "data_type": "BOOL",
          "gpio.mode": "output",
          "key": "RELAY_2",
          "title": "Plot B"
        },
        {
          "BCM": 13,
          "data_type": "BOOL",
          "gpio.mode": "output",
          "key": "RELAY_3",
          "title": "Plot C"
        },
        {
          "BCM": 16,
          "data_type": "BOOL",
          "gpio.mode": "output",
          "key": "RELAY_4",
          "title": "Plot D"
        },
       {
        "BCM": 21,
         "data_type": "BOOL",
         "gpio.mode": "input",
         "key": "RAIN_SENSOR",
       }
      ]
    }
  ]
}
We can activate one of the relays using the following HTTP PUT request.
PUT /values HTTP/1.1
Content-Type: application/json; charset=utf-8
Host: royal9:8081
Connection: close
Content-Length: 16

{"RELAY_1":true}
We can also read the status of the rain sensor with the following
http://royal9:8081/values/?RAIN_SENSORSetting up the Sequence
Now that we have the devices defined, let’s move forward to setting up an automated sequence. We do this by adding a sequence entry to the piotserver configuration file.
I want to trigger the sequence at sunrise. However, I will gloss over the details of this topic for now. I promise to dig deep into the “trigger” field in the following article.
I also set up a “condition” entry to evaluate “RAIN_SENSOR == 0”; which is when it is wet enough to short the rain sensor switch to ground.
This condition is checked after the sequence is triggered, but before any of the steps are run. It will also be checked periodically, and the sequence will be aborted if the condition evaluates to false.
The “steps” entry of the sequence is a JSON array. Each step has an “action” entry and an optional “duration” in seconds to run those actions.
In this example, we see the following will occur:
Trigger at sunrise
Check if “RAIN_SENSOR == 0”
Set RELAY_1 on for 10 seconds.
Set RELAY_1 off, and then RELAY_2 on for 10 seconds.
Set RELAY_2 off, and then RELAY_3 on for 10 seconds.
Set RELAY_3 off, and then RELAY_4 on for 10 seconds.
Set RELAY_4 off
If at any time the RAIN_SENSOR is not equal to zero, then run the “on_abort” actions.
Set RELAY_1 off
Set RELAY_2 off
Set RELAY_3 off
Set RELAY_4 off
This is what the sequence entry to do the above would look like:
  "sequence": [
    {
      "sequenceID": "1000",
      "name": "sprinkler control",
      "description": "day to day sprinkler sequence",
      "condition": "RAIN_SENSOR == 0",
      "trigger": {
        "timeBase": "sunrise"
      },
      "steps": [
        {
          "duration": 10,
          "action": [
            {
              "cmd": "SET",
              "key": "RELAY_1",
              "value": "on"
            }
          ]
        },
        {
          "duration": 10,
          "action": [
            {
              "cmd": "SET",
              "key": "RELAY_1",
              "value": "off"
            },
            {
              "cmd": "SET",
              "key": "RELAY_2",
              "value": "on"
            }
          ]
        },
        {
          "duration": 10,
          "action": [
            {
              "cmd": "SET",
              "key": "RELAY_2",
              "value": "off"
            },
            {
              "cmd": "SET",
              "key": "RELAY_3",
              "value": "on"
            }
          ]
        },
        {
          "duration": 10,
          "action": [
            {
              "cmd": "SET",
              "key": "RELAY_3",
              "value": "off"
            },
            {
              "cmd": "SET",
              "key": "RELAY_4",
              "value": "on"
            }
          ]
        },
        {
          "duration": 0,
          "action": [
            {
              "cmd": "SET",
              "key": "RELAY_4",
              "value": "off"
            }
          ]
        }
      ],
      "on_abort": {
        "action": [
          {
            "cmd": "SET",
            "key": "RELAY_1",
            "value": "off"
          },
          {
            "cmd": "SET",
            "key": "RELAY_2",
            "value": "off"
          },
          {
            "cmd": "SET",
            "key": "RELAY_3",
            "value": "off"
          },
          {
            "cmd": "SET",
            "key": "RELAY_4",
            "value": "off"
          }
        ]
      }
    }
  ]
Forcing a Sequence to Run
Upon starting up, the piotserver will try to run all the scheduled sequences, including those that it may have missed running some that day. In our example above, if it is after sunrise, the sequence will be executed because the system will try to catch up to the day’s events.
You might have noticed above that I assigned this sequence an ID of 1000. I did this so that I would know in advance which ID number to use to trigger the sequence with a REST command. That way, we can issue an HTTP PUT request to execute the sequence with that ID.
PUT /sequences HTTP/1.1
Content-Type: application/json; charset=utf-8
Host: royal9:8081
Connection: close
Content-Length: 21

{"sequenceID":"1000"}
Sequence Groups
While building the chicken coop, I also became aware of another problem related to managing schedules and events.
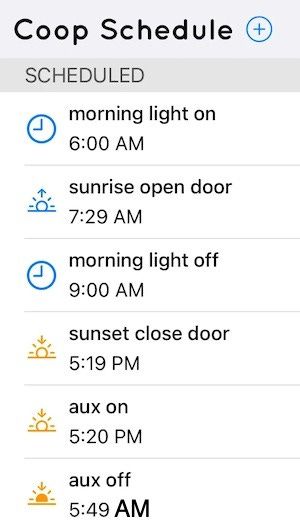
Referring back to Figure 1 above, we scheduled the door to open at 7:29 AM and close at 5:19 PM. Let’s imagine a power failure occurs at 5:00 PM, and power is restored shortly after at 5:30 PM How should our system recover? Should it run all the tasks again, opening and closing the door? Or should it skip the 5:19 PM door close command and start the next morning?
One attempt at solving this is the concept of a sequence group. The groups provide a way to associate sequences together, allowing us to reconcile which sequences should run after a power interruption.
For example, if we create the following entry in the configuration file, the piotserver knows this by examining the trigger time of sequence IDs 2000 and 2001.
On startup, the system determines all the sequences that should have been triggered so far that day. If the sequences are included in a “sequence.groups” entry, then the piotserver only executes the last one in the group that is eligible to run.
  "sequence.groups": [
        {
            "sequenceIDs": [
                "2000",
                "2001"
            ]
        }
    ]
This sequence of groups is not only a solution to our power fail recovery issues, but it’s one way to do it without having to record which events ran that day.
Bear with me
I have only skimmed the surface of what you can do with the devices and sequence components of the configuration file. In the next article, I will dig into the capabilities of the “trigger” field in more detail, and you will see just how powerful this feature really is.
This post is part of the Off-Grid Farm Automation with Raspberry Pi series — a full DIY walkthrough of building a self-hosted system for sensors, valves, and automation, no cloud required.


