


I’ve written a couple of articles lately about some of the dashboards I built for the farm. One lets me keep an eye on the irrigation system and shows me the schedules, valve activity, and what’s going on with it. Another is connected to my off-grid weather station, where I can check the current conditions, watch the trends, and dig back through the history.
These sites work great on my local network, but now and then I leave the ranch to pick up chicken feed, or maybe just have a life, and I still want to check up on things. The problem is, how do I get to my sites without inviting every smelly script-kiddie wannabe, AI bot, or Beijing-sponsored cyber rats to come knocking?
So I had to find a balance between wanting complete control over my self-hosted systems and the convenience of reaching them from anywhere, without hanging my home network out on the open Internet.
What I discovered is that it doesn't have to be all or nothing. I can still own the hardware, control the software, and keep the data on my own servers. The key is putting Cloudflare in front as the secure front gate to everything behind it.
What’s a Cloudflare?
You’ve probably used Cloudflare hundreds of times without realizing it. Ever click on a website and get that little “Verifying you are human...” screen before the page appears?
Am I the only one who finds it ironic that a machine is asking a human that question?
That’s Cloudflare at work. It’s one of the more visible things they do, but it barely scratches the surface of what the company actually does.
Cloudflare traces its roots back to an anti-spam project. In 2009, the people behind it realized the bigger challenge wasn’t just fighting spam. It was making the Internet itself faster and more secure. The story goes that because they were building a “firewall in the cloud,” the name Cloudflare just seemed to fit. Since then, they’ve grown into one of the largest Internet infrastructure companies in the world. A huge amount of all Internet traffic now passes through their network every day.
Cloudflare offers everything from DNS and content delivery to DDoS protection, web application firewalls, Zero Trust security, tunnels, serverless computing, and cloud storage.
Despite all that, Cloudflare doesn’t host my applications. My servers stay in my house. I use Cloudflare to create a secure tunnel between my users and those servers, making the connection faster, more reliable, and a lot harder to attack.
So What's the Catch?
Yeah so how much is this going to cost me?
Well, maybe nothing. But we both know there’s no such thing as a free lunch.
The free tier is part of Cloudflare’s business model. They give a lot away to regular users and hobbyists, and most people never pay anything. When some of those users grow and need higher limits, better tools, advanced features, or real support, that’s when Cloudflare makes its money.
It’s simple economics. Cloudflare already operates one of the largest networks on the Internet. Adding another small website or home lab to that network costs them almost nothing, but it introduces another potential long-term customer.
For self-hosters, the free plan is usually more than enough.
The Old Way
Before Cloudflare Tunnel came along, exposing a home server to the Internet involved a lot of moving parts and was often hit or miss. I still have the scars from doing it for years, going all the way back to the old WildBlue satellite days.
First, you needed a public IP address. If your ISP changed it from time to time, as many do, you also needed a Dynamic DNS service so people could still find your server.
Next came port forwarding. You’d log into your router and tell it that incoming traffic on ports like 80 (HTTP) or 443 (HTTPS) should be forwarded to a specific machine on your local network.
If you used HTTPS, you had to deal with X.509 certificates. Even today with services like Let’s Encrypt, you still have to obtain, install, and renew them.
Then there was the firewall. Opening ports to the Internet meant making sure only the traffic you wanted could get through while keeping everything else out.
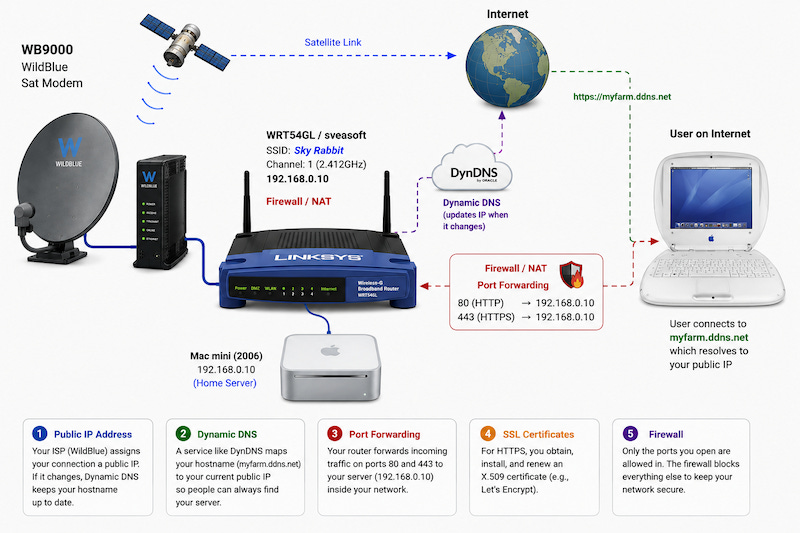
And if you wanted to self-host, this is the crap you had to go through just to be reachable on the Internet. I’m sure plenty of sites still do it this way.
You owned every piece of it. DNS had to be right. The public IP had to stay current. Port forwarding had to work. Certificates had to get renewed. Firewall rules had to stay tight. It could work fine for months, then one little thing would break and you’d be screwed, looking for a fix to the problem.
Why I Started Looking at Cloudflare
Fast forward to 2026. My Internet connection is now Starlink. It’s absolutely amazing. It’s stupid easy to set up, it’s fast, and it just works.
Unfortunately, there’s one catch. Starlink uses Carrier-Grade NAT (CGNAT).
Instead of giving every customer their own public IP address, you’re sharing one with a bunch of other customers. From the rest of the Internet’s point of view, it doesn’t see your network. It only sees Starlink’s. That put me right back where I started during the old WildBlue days, just with a whole lot more bandwidth.
My first thought was, “No problem. I’ll just use Dynamic DNS.” Unfortunately, all that would do is point my domain name to Starlink’s shared public IP address. That address doesn’t belong to my router, it belongs to Starlink’s CGNAT gateway.
From there, the connection has nowhere to go. Starlink has no port-forwarding rule telling it which customer should receive the incoming connection, so the traffic just stops. Their default CGNAT policy blocks inbound ports, there’s no way to forward them to your router.
So where does that leave us? I asked around to a bunch of buddies who are way smarter than me and pretty much came to the same conclusion. Today there are really three practical ways to reach self-hosted services when you’re stuck behind CGNAT.
One option is to build a private network using something like Tailscale. It works well if you’re willing to install software on every device that needs access and limit those services to yourself or a small group of trusted users.
The other option, and I didn’t even know they offered this, is to pay Starlink for a public IP address. That usually means moving to a higher-priced Priority plan. Even then, it gets you right back to the traditional model of port forwarding, certificates, and firewall rules.
Neither of those worked for me. I wanted to keep my servers and my LAN private, while allowing selected applications to be available from anywhere, without requiring users to install any special software.
That’s what led me to the Cloudflare Tunnel.
Cloudflare Tunnel
A Cloudflare Tunnel flips the usual model the other way around.
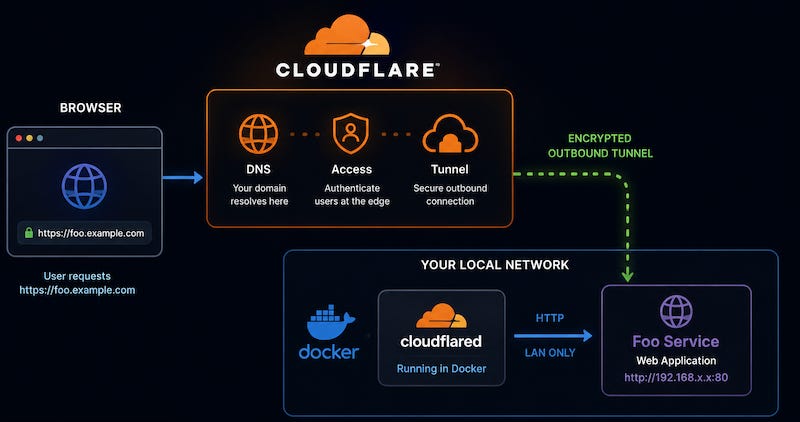
Instead of opening ports on your router and waiting for the Internet to connect to you, your server reaches out to Cloudflare and keeps an encrypted connection open. When someone types your website address in a browser, the request goes to Cloudflare first. Cloudflare then sends it down the tunnel to your server, and the response travels back the same way.
Nothing on your home network is waiting for random connections from the Internet. There are no inbound ports to open, no port forwarding, and no direct exposure of your home network to the Internet.
This is what Cloudflare calls Zero Trust. The old model basically trusted anything that managed to reach your open ports. Zero Trust is the opposite. Nothing is trusted by default. Every request has to prove itself, and your actual servers stay hidden. With a Cloudflare Tunnel the access can be controlled at Cloudflare’s edge before anything ever reaches your network.
That’s what makes it one of Cloudflare’s coolest features. Your servers stay private, but the applications you choose to publish can still be reached from anywhere through a normal website address.
Setting up Cloudflare
There are a few hoops to jump through the first time around, but that's about it. Once everything is in place, adding another application takes just a few minutes.
Create an Account.
You’ll need a Cloudflare account. If you don’t already have one, go to https://www.cloudflare.com/plans/ and sign up. The free plan is enough for everything in this article.
Do the DNS Dance.
For the tunnel to work cleanly, Cloudflare has to be your DNS provider. When Cloudflare controls the DNS, it can route a name like myapp.yourdomain.com through their network and straight into your tunnel. If someone else is still handling the DNS, the traffic never reaches Cloudflare properly and the tunnel can’t do its job.
That doesn’t mean you have to buy the domain from them. If you like your registrar, you can keep your registrar (Porkbun, Namecheap, GoDaddy, etc.). Just point the nameservers at Cloudflare and leave the registration wherever it already is.
When you add your domain to Cloudflare, they give you two nameserver addresses that look something like foobar.ns.cloudflare.com and bozo.ns.cloudflare.com, or whatever they assign you.
You log into your registrar, find the nameserver settings for the domain, and replace whatever is currently there with the ones Cloudflare gave you. Once that change propagates, Cloudflare is in charge of the DNS and can route traffic into your tunnel.
That’s the only real requirement, and the good news is you only have to do this once. After the nameservers are updated, the rest of the setup happens inside Cloudflare.
Create a Tunnel
Once your domain is on Cloudflare and the nameservers have updated, the next step is to create a tunnel.
To me this is the hardest part: finding it in the Cloudflare website. They offer so many services that it’s easy to get lost, and it feels like they rearrange the whole thing every other week.
In the Cloudflare dashboard, look for Zero Trust. From there go to Networks → Tunnels. Or just type “Tunnels” in the dashboard search bar. That’s often the fastest way. Make sure you’re creating a Cloudflare Tunnel, not anything labeled Mesh. You want the tunnel.
You’ll land on a page that asks you to name it. The name is only for your own tracking, so call it whatever you want.
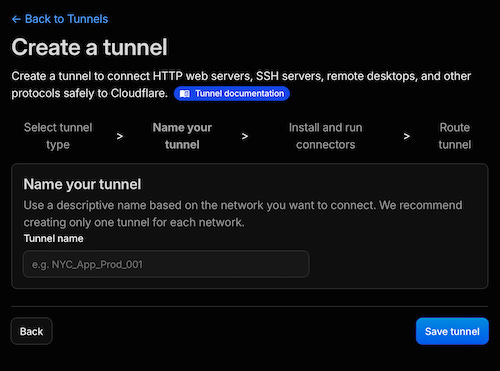
Once you name the tunnel, Cloudflare takes you to the Install and run a connector screen. They show you a bunch of options (Docker, Linux, Windows, macOS, etc.).We’re not actually going to use any of those full install commands. What we really want is the token.
The easiest way I’ve found is to select Docker. Cloudflare will show you a long docker run command that includes a --token followed by a huge string that starts with something like eyJhIjoi....
Copy that whole token (everything after --token) and save it for now. That’s the only piece we need for the Docker setup later.
After you grab the token, Cloudflare sends you to the Route Traffic screen. This is where you tell the tunnel which public name should point to which local service.
Hostname
Pick a subdomain (like myapp) and choose your domain. That becomes the public address, for example myapp.yourdomain.com.
Path
Leave it blank unless you only want a specific path.
Service
Set the type to HTTP and put in the address of your service. Because we’re running things in Docker, this is usually not localhost.
You’ll typically use one of these:
The Docker service name (if cloudflared is on the same Docker network), for example http://myapp:8080
The host machine’s IP address, for example http://192.168.1.50:8080
The key point is that the address has to be reachable from inside the cloudflared container.
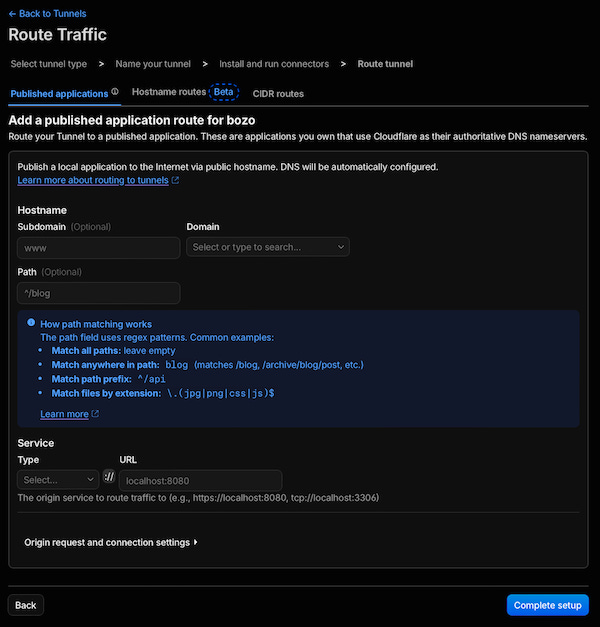
Once you hit Complete setup, Cloudflare will create the DNS record for you. You can add more hostnames later if you need them.
Setup Your Side
At this point I’m assuming you already have your web app (or whatever service you want to expose) up and running on your local network. For the rest of this article, I'll assume it's plain HTTP.
You can point the tunnel at an HTTPS service, but on a local network it’s usually more trouble than it’s worth. You often end up flipping on “No TLS Verify” because the local certificate doesn’t match what Cloudflare expects. Cloudflare already handles HTTPS on the public side. So I generally don’t bother encrypting the short hop inside my own LAN. Pointing the tunnel at something like http://192.168.1.50:8080 or http://myapp:8080 is the simple way most of us do it.
That said, we need to run the Cloudflare Tunnel connector so it can reach that service and keep the outbound connection open to Cloudflare.
I run the connector in Docker. Same reason I run most things in Docker: it’s simple, consistent, and easy to update. Instead of installing cloudflared on the host, I just use the official image. When a new version comes out I pull it and restart the container.
One thing that tripped me up the first time was Docker networking. Remember, cloudflared is running inside its own container. When you tell Cloudflare your application is at http://127.0.0.1:8080 , it’s looking for a web server inside the cloudflared container, not on your Raspberry Pi or another container. If your application is containerized, point the tunnel at the Docker service name, for example http://farm-web:8080. If it’s running directly on the host, use the host’s LAN IP address instead.
The other advantage of using the Docker container that I can run more than one connector from the same docker-compose.yml file if I want to run multiple tunnels. Each one gets its own service name and its own token. I keep the tokens in a separate .env file so they don’t end up in the compose file itself. And if I decide to punt a tunnel, all I have to do is edit that file and restart the container.
On the machine running the connector, I keep the whole Cloudflare tunnel setup in its own directory. Inside it are just two files: a docker-compose.yml and a .env file that holds the tokens.
The docker-compose.yml looks like this:
services:
  cloudflare-your-service:
    image: cloudflare/cloudflared:latest
    container_name: cloudflare-your-service
    restart: unless-stopped
    command: tunnel run
    environment:
      - TUNNEL_TOKEN=${YOUR_TOKEN}
    tmpfs:
      - /var/log

  cloudflare-another-service:
    image: cloudflare/cloudflared:latest
    container_name: cloudflare-another-service
    restart: unless-stopped
    command: tunnel run
    environment:
      - TUNNEL_TOKEN=${ANOTHER_TOKEN}
    tmpfs:
      - /var/log
And the .env file in the same directory holds the tokens.
YOUR_TOKEN=eyJhIjoiNDg0NTE3Mj......
ANOTHER_TOKEN=eyiEyiYoTE3Mj......
Then I just run:
docker compose up -dThat's it. The container starts, authenticates with Cloudflare using the tunnel token, and establishes the encrypted tunnel automatically.
Testing That It Works
Once the container is running, the first thing I do is simply open the public URL in a browser. If the page comes up, the tunnel is probably working.
If it doesn’t, the Cloudflare Zero Trust dashboard is the next place to look. Under Tunnels, you should see your connector with a Healthy status. If it isn’t healthy, there’s no point chasing anything else until you fix that.
Cloudflare also lets you watch the tunnel in real time. You can open the log stream from the tunnel page and see requests as they come through. When something isn’t working, that’s usually where I start looking.
One last check is to try the site from somewhere outside your home network. Turn off Wi-Fi on your phone or grab another Internet connection. That confirms you’re really reaching the service through Cloudflare and not accidentally talking to it over your local network.
At this point the tunnel is up and working. Your application is reachable through Cloudflare, and your home network is still sitting behind your firewall.
There’s just one problem. Right now, anyone who knows the URL can reach your application. The tunnel hides your network, but it doesn’t decide who gets in.
That’s where Cloudflare Access comes in. We’ll put an authentication layer in front of the tunnel so only the people you choose can get through.
Authentication with Cloudflare Access
Instead of making your application handle logins, you can have Cloudflare check the user’s identity before the request is ever sent down the tunnel. If the person isn’t allowed in, the traffic never reaches your server. That keeps the attack surface smaller, and you don’t have to bolt authentication onto every individual app.
At the time of this writing, Cloudflare Access supports a bunch of login methods. Most of the convenient ones (Google, Microsoft, GitHub, and the rest) just hand the problem off to an outside provider who gets to decide whether a request should be allowed through. Which defeats the purpose of self-hosting as far as I am concerned.
There is one method I find acceptable, even if it isn’t perfect: Email one-time PIN. Cloudflare sends a short code to the user’s email address. If you're already using a privacy-focused email provider like Proton Mail, it’s a reasonable compromise. It’s still not fully self-hosted, and Cloudflare isn’t encrypting the message with your PGP key, but it’s the least bad of the convenient options.
I’ve been skeptical of these identity problems for a long time (I wrote about the difficulty of verifying authenticity of public keys years ago). That experience is part of why I’m not eager to hand the whole problem over to the tech bros at Google, Microsoft, or even Apple.
Turning on Cloudflare Access
Activating Cloudflare Access isn't too hard once you figure out where they've hidden it this week. Honestly, every time I set one up I either end up skimming the documentation or asking AI where everything moved. I swear they rearrange the menus every other week.
Last time I checked, it was under Access Controls → Applications. Create a Self-hosted application, give it a name, select the hostname you already created for the tunnel, and choose One-time PIN as the login method.
Next, create a policy that includes the email addresses you want to allow. You can enter individual addresses or allow an entire email domain. You can also decide how long a login session stays valid before users have to sign in again.
One last thing: don’t forget to click Save on the policy. This tripped me up more than once.
The Nuts an Bolts of One-Time PIN
So here’s what happens when someone hits a hostname protected by Access. Cloudflare intercepts the request before it ever goes down the tunnel. The browser is shown a login page that asks for an email address.
Once someone gets past the PIN, Cloudflare creates a signed JSON Web Token (JWT) and stores it in the browser as the CF_Authorization cookie. That same token also shows up on your server in a header called Cf-Access-Jwt-Assertion.
The JWT carries the identity info (email, when it was issued, etc.) and is signed by Cloudflare so it can’t be casually messed with. On later visits the browser just sends the cookie along and Cloudflare checks it. If it’s still valid, the request goes down the tunnel.
One thing that tripped me up: JavaScript in the browser can’t read the Cf-Access-Jwt-Assertion header. Backend code or nginx can. If your front-end needs the identity info, the cleanest approach is to create a small endpoint that returns only the specific data the page actually needs. Don’t hand the full token to the browser. It’s a reusable credential, and a hacker who gets hold of it can use it to get into your system.
Here’s a simple nginx example that extracts the JWT payload and serves it at /access-info:
map $http_cf_access_jwt_assertion $cf_access_jwt_payload {
    default "";
    ~^[^.]+\.(?<cf_access_payload_segment>[^.]+)\.[^.]+$ $cf_access_payload_segment;
}

server {
    listen 80;
    server_name _;
    root /usr/share/nginx/html;
    index index.html;

    location = /access-info {
        default_type text/plain;
        add_header Cache-Control "no-store, no-cache, must-revalidate, max-age=0" always;
        add_header Pragma "no-cache" always;
        add_header Expires "0" always;
        add_header X-Content-Type-Options "nosniff" always;

        if ($cf_access_jwt_payload = "") {
            return 204;
        }
        return 200 $cf_access_jwt_payload;
    }
}
This returns only the middle segment of the JWT (the Base64-encoded payload), not the full signed token. Your JavaScript still needs to decode it to read the identity information.
You can debug it yourself by going to yoursite/access-info and pasting the returned string into https://www.jwt.io That will decode the payload so you can see exactly what Cloudflare is sending.
What Cloudflare Doesn’t Do
A couple of parting thoughts, just so I don’t leave you with the wrong impression.
Cloudflare Tunnel is not a VPN. It’s a secure way to publish selected applications, not your entire network, over a private overlay like Tailscale or a traditional VPN.
It also doesn’t replace your firewall. Your home network should still be locked down. The tunnel simply eliminates the need to open inbound ports for the applications you choose to publish.
Cloudflare won't magically fix your bad software. If an application has security vulnerabilities, they'll still be there. Cloudflare Tunnel and Access just reduce your exposure, it doesn’t fix insecure code.
Cloudflare doesn't replace good operational discipline. You still need to keep your systems patched, make backups, and follow good security practices. It’s a layer of protection, not a substitute for the basics.
Cloudflare is a force multiplier for the little guy. It gives you access to the same kind of network and security services that used to be reserved for companies with dedicated IT departments and million-dollar budgets... assuming they still have a clue and haven't outsourced all their thinking to an LLM.
If you have a clue and like the idea of controlling your own world, you’ll probably enjoy much of what I write about, whether the subject is electronics, software, baking, perfume, or motorcycles. The subject changes without warning, but the questions never do: How does it work? Why was it built that way? And can I build, fix, or control it myself?
Hitting like and sharing helps real people find the work. The algorithm can go pound sand.