

I’ve spent a lot of time in this series showing how I built the self-hosted piotserver infrastructure for controlling irrigation and monitoring environmental conditions on our farm. The funny part is that there is nothing particularly “farm” about any of it. The same machinery works just as well for lights, switches, dimmers, and smart plugs around the house.
Ironically, that's where the whole project started.
Like many home automation hackers of the time, I got my start with X10, which I came across in the aisles of RadioShack. X10 was pretty cool for its day, but I found its power-line signaling frustratingly unreliable.
By 2010, I had migrated much of my home to Insteon switches and dimmers. Insteon improved on those ideas with a faster dual-mesh network that combined power-line and RF communication while remaining backward compatible with many existing X10 installations.
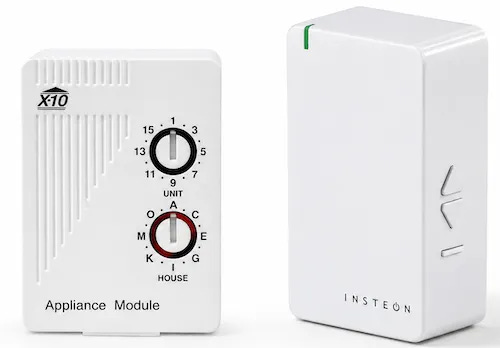
At the center of it all was the Indigo home automation server, running on a dedicated Mac mini. It was a solid product for its time, but over the years the interface barely evolved. Eventually I found myself wondering why I was paying a subscription for software I was convinced I could build better myself.
It didn’t take me long to reverse engineer the Insteon PowerLinc protocol, even with all its quirks. Before long, my own code was running on a Mac mini, along with an iPhone app I wrote to schedule and control everything from indoor lighting to outdoor Christmas lights. The original project is still available on GitHub.
That old project became the foundation for what eventually evolved into pIoTServer.
I recently went digging through the old configuration files and was surprised by how much of the original design is still there. Devices were organized into groups, events triggered actions, schedules automated the house, and every capability was exposed through a REST API that my iPhone app used for control.
Insteon itself did not fare as well. The company’s servers abruptly went tits up in 2022, leaving customers up the creek with little warning. I heard that a group of Insteon users later acquired the company, brought its services back online, and began developing and selling products again.
Today’s pIoTServer, the same system that runs our farm irrigation, is more sophisticated and hardware-agnostic. It can run on something as small as a Raspberry Pi, but the underlying design remains remarkably similar.
Life After Insteon
Insteon demonstrated that there was a market for home automation that ordinary homeowners could install and manage themselves. It also demonstrated the risk of depending on a proprietary ecosystem.
Let’s not do that again.
Today there is no shortage of alternatives. Zigbee, Z-Wave, Wi-Fi, and the newer Matter standard are all supported by multiple manufacturers, making it much easier to avoid being locked into a single proprietary ecosystem.
Z-Wave was created by the Danish company Zensys as a proprietary technology. Zensys controlled the radio chips and protocol stack, and that control later passed to Sigma Designs and then Silicon Labs.
For most of its history, Z-Wave was tightly controlled. The chips, software stack, certification process, and trademark all ran through a fairly small commercial ecosystem. The same exact shit I was trying to avoid.
Z-Wave is less closed today, with the Z-Wave Alliance taking a larger role in maintaining the standard and opening it to additional silicon and stack suppliers.
Zigbee came from the other direction. The Zigbee Alliance, now called the Connectivity Standards Alliance, or CSA, was formed as a consortium of companies developing a shared standard. Zigbee builds its networking, security, and application layers on the separate IEEE 802.15.4 radio standard. That allowed multiple semiconductor companies to produce compatible radios and software stacks, while manufacturers built switches, plugs, sensors, and dimmers on top of them.
Zigbee has its own certification rules, working groups, and bureaucracy, but it was not nearly as bad as the Z-Wave world.
Zigbee
Each has its own strengths and weaknesses, and I could have made a case for any of them. I first tried Z-Wave, but after fussing with it for far too long, I gave Zigbee a try. It worked the first time.
It was stupid easy to add and configure a new Zigbee device. From the dashboard, you simply enable Permit Join, walk over to the device, and hold down its configuration or power button until it enters pairing mode. A few seconds later, the device appears, usually already identified ,with all of its supported features ready to use. You can keep adding as many devices as you like while Permit Join is enabled, then simply turn it off again when you’re finished.
I found a surprisingly wide range of Zigbee devices. Leviton made a basic wall switch, SONOFF made a really nice plug, and Suraielec had an outdoor plug that fit what I needed. A lot of Zigbee hardware comes from common OEM designs, so the same basic switch, plug, or power stake often appears under several different brand names with slightly different electronics, firmware, or packaging.
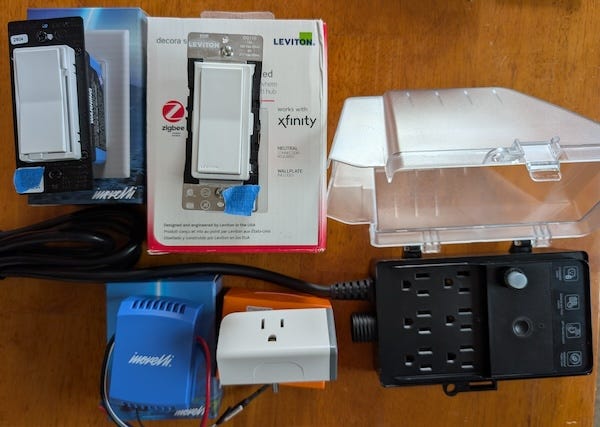
And then there is Inovelli, a small company from Kalamazoo, Michigan. Their devices are in a different class entirely.
The design is thoughtful, the controls feel solid, the LED bar can be configured for status and notifications, and nearly every behavior can be adjusted. But what really impressed me was the attention paid to the parts most people will never notice. The terminals, mounting hardware, and even the screws that hold the wires all feel like someone actually cared.
Inovelli is the Michelangelo of home-automation electronics.
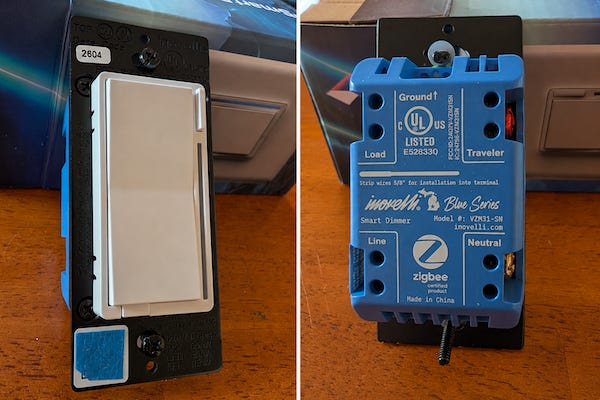
I have written before about the art hidden inside the things we create. Inovelli is a perfect example. It is easy to make a switch that works. It is something else entirely to make one beautiful.
Under the Zigbee Hood
Zigbee devices operate in the same 2.4 GHz band used by Wi-Fi and Bluetooth, but they use far less bandwidth. With a raw data rate of only 250 kilobits per second, Zigbee is not intended to stream video or move large files. Instead, it sends small messages: turn on, set brightness, report a temperature, or announce that a button was pressed.
One thing to keep in mind is that Zigbee shares the 2.4 GHz band with Wi-Fi, so it helps to keep their channels apart. My network uses Zigbee channel 11, so I keep nearby Wi-Fi off Wi-Fi channel 1.
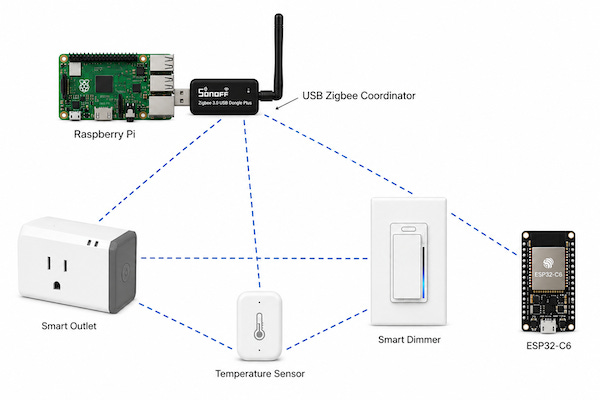
Every Zigbee network begins with a coordinator. It creates the network, chooses the radio channel, manages security, and allows new devices to join.
Utility-powered devices such as switches, plugs, and dimmers usually act as routers. Besides performing their own jobs, they relay messages for other devices, extending the range of the network.
Battery-powered sensors are generally end devices. They sleep most of the time, wake long enough to send or receive a small message, then go back to sleep. Because they do not relay traffic for other devices, they can run for months or even years on a battery.
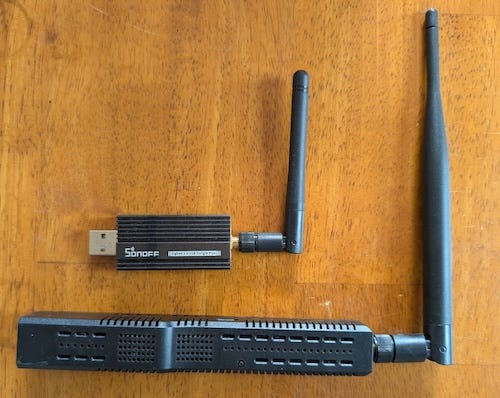
The two devices shown here are Zigbee coordinators. Each contains a Zigbee radio, an antenna, and firmware that handles the lower levels of the Zigbee protocol. One is the SONOFF USB dongle; it plugs directly into the computer and is often adequate for a small home installation.
The other is an SMLIGHT SLZB-06P7U Ethernet Zigbee coordinator. It connects to your local network over Ethernet and can be powered by PoE, allowing it to be placed wherever it provides the best Zigbee coverage.
A Zigbee network can contain many routers and end devices, but only one active coordinator. In this setup, device reports and commands handled by Zigbee2MQTT ultimately pass through the coordinator, sometimes by way of one or more routers.
The coordinator handles the radio traffic, but it still speaks Zigbee. Applications need a simpler way to exchange information about devices. That is where MQTT enters the picture.
MQTT
MQTT is a lightweight messaging protocol designed for communication between machines. It was created in 1999 by Andy Stanford-Clark of IBM and Arlen Nipper of Arcom to monitor oil pipelines as part of a SCADA industrial control system. The equipment communicated over satellite links, where bandwidth was slow and expensive, so the protocol had to be simple, efficient, and reliable.
Those are the same qualities I would want for sensors, embedded computers, and in this case home automation.
MQTT uses a publish-and-subscribe model. Programs do not normally send messages directly to one another. Instead, they connect to an MQTT broker, which receives messages and distributes them to any clients interested in them. The broker is the central post office for the system. Several MQTT broker implementations are available. I happen to use Mosquitto, a lightweight, open-source broker.
MQTT Messages are organized by topic. A temperature sensor might publish a value like this:
Topic: home/kitchen/temperature
Message: 72.4
Another program can subscribe to that topic and receive each new value as it is published. It does not need to know where the sensor is connected, what kind of hardware produced the reading, or which program sent it.
Commands work the same way:
Topic: home/living-room/lamp/set
Message: ON
Any program can publish the command, and whichever program or device subscribes to that topic can act on it. Your code only needs to understand the topic and the message. It doesn’t need to know how the rest of the system works.
Zigbee devices do not speak MQTT, and MQTT clients do not understand Zigbee. Zigbee2MQTT is the bridge between the Zigbee coordinator and the MQTT broker, translating Zigbee traffic into MQTT messages and MQTT commands back into Zigbee.
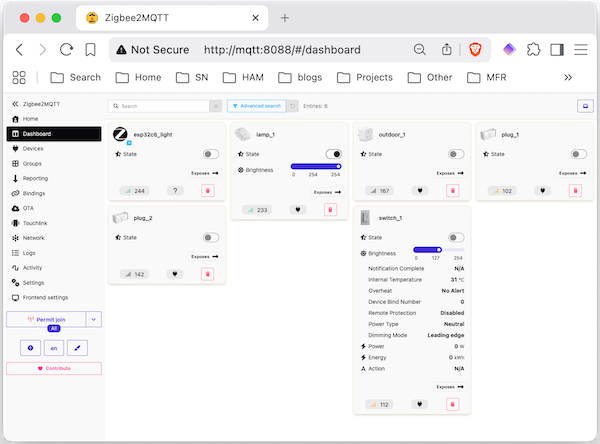
Zigbee2MQTT also includes an optional web interface that is useful for managing and debugging the Zigbee network. It can be used to pair and rename devices, view their state and capabilities, change settings, inspect logs, and send test commands.
Mosquittoes Buzzing on the Farm
The Mosquitto project includes more than the broker itself. The project also provides command-line tools and a C client library called libmosquitto.
The command-line tools make it possible to publish messages, subscribe to topics, and watch traffic passing through the broker without writing any code. mosquitto_pub sends a message to a topic, while mosquitto_sub subscribes to one or more topics and prints the messages it receives. They are particularly useful for testing and debugging an MQTT system.
In my earlier article, Writing Your Own Drivers, I wrote about how pIoTServer adds new hardware through plugins. MQTT is just another one. The only difference is that this driver uses libmosquitto to connect to the broker, subscribe to configured topics, and publish commands when values change. Once loaded, pIoTServer treats MQTT devices no differently from any others.
All pIoTServer devices are defined in the JSON configuration file. Adding MQTT support is simply a matter of adding another device definition. In this example, the driver connects to an MQTT broker and exposes two Zigbee smart plugs as pIoTServer output values.
{
    "devices": [
        {
            "deviceID": "MQTT_1",
            "device_type": "MQTT",
            "mqtt.host": "<your server>",
            "pins": [
                {
                    "data_type": "BOOL",
                    "gpio.mode": "output",
                    "key": "PLUG_1",
                    "other.props": {
                        "mqtt.target": "plug_1"
                    }
                },
                {
                    "data_type": "BOOL",
                    "gpio.mode": "output",
                    "key": "PLUG_2",
                    "other.props": {
                        "mqtt.target": "plug_2"
                    }
                }
            ]
        }
    ]
}
The complete source code for the MQTT driver is available on GitHub for anyone who would like to explore the implementation.
To turn on PLUG_1, we send a REST PUT request to pIoTServer with the new value in the request body. For example:
PUT /values HTTP/1.1
Content-Type: application/json; charset=utf-8
Host: royal9:8081
Connection: close
Content-Length:  15

{"PLUG_1":true}
Conversely, to retrieve the current state of PLUG_1, we send a REST GET request to pIoTServer:
GET /values?keys=PLUG_1 HTTP/1.1
Host: royal9:8081
Connection: close
he response includes the current value of the plug, along with its title, timestamp, and other metadata:
{
    "values": {
        "PLUG_1": {
            "auto": false,
            "display": "false",
            "time": 1785279894,
            "value": "0"
        }
    }
}
MQTT devices can also be controlled by the pIoTServer scheduler. This example turns PLUG_1 on automatically at sunset.
"sequence": [
    {
        "enable": true,
        "name": "Sunset",
        "trigger": {
            "timeBase": "sunset"
        },
        "steps": [
            {
                "action": [
                    {
                        "cmd": "SET",
                        "key": "PLUG_1",
                        "value": "on"
                    }
                ]
            }
        ]
    }
]
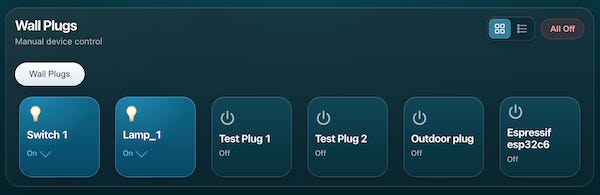
Of course, REST requests and scheduled sequences are only part of the story. Because MQTT devices are integrated into pIoTServer like any other device, they automatically appear in the web dashboard. They can be monitored, switched on and off, and incorporated into schedules alongside I²C, 1-Wire, and RS-485 devices without any special handling. The dashboard itself is described in my earlier article, A Dashboard for My Garden Irrigation.
By this point, I no longer have to think about MQTT. As far as the rest of pIoTServer is concerned, these are just devices.
Beyond Smart Plugs
Smart plugs are an easy place to start, but Zigbee is not limited to commercial switches and sensors. It is also possible to build your own Zigbee devices using inexpensive development boards.
I am currently experimenting with an ESP32-C6-based device that joins the Zigbee network and communicates through Zigbee2MQTT like any other device. The ESP32-C6 includes an IEEE 802.15.4 radio for Zigbee and Thread, and Espressif provides an official Zigbee SDK with working device examples.
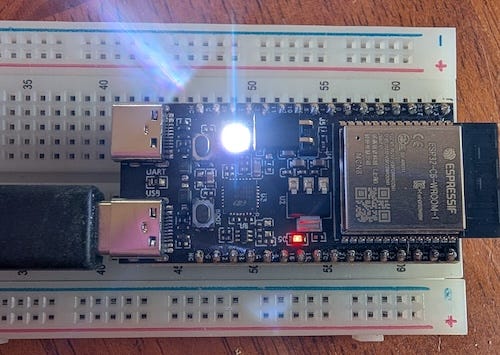
In my test, a simple on/off-light application joined the network. After I added a small external converter describing the device to Zigbee2MQTT, it could be controlled by pIoTServer through the same MQTT interface used for commercial plugs and dimmers.
This opens the door to all sorts of custom sensors, relays, lighting controls, garage-door controllers, and other cool devices I haven’t even thought of yet.
What Didn’t Change
Adding MQTT support didn’t require changing the rest of pIoTServer. The REST interface, scheduler, dashboard, and existing device model works the same as before. The MQTT plugin just translates between pIoTServer values and MQTT messages. No hacks. No MQTT-specific paths through the rest of the code.
Zigbee and MQTT extend pIoTServer beyond hardware connected directly to the Raspberry Pi. They make it practical to use off-the-shelf home automation products while still supporting custom devices built for a particular job. Smart plugs are only the beginning. The same approach can be used for switches, dimmers, sensors, lighting controls, and whatever else I decide to build next.
Oh, and for the TL;DR readers asking, “Why not just use Home Assistant?” After Insteon died, I did, for several years. Eventually, I decided I wanted a system that wasn't constantly changing underneath me. As I explained in We Don’t Need No Stinking Ecosystem, I wanted a small, self-hosted platform that I could completely understand, one that didn't surprise me with constant updates and that I could extend as my needs evolved.
That theme of controlling your own world runs through much of what I write, whether the subject is electronics, software, baking, perfume, or motorcycles. The subject may change without warning, but the underlying questions are usually the same: How was this made? Why was it built this way? And who gets to control it?
Hitting like and sharing helps real people find the work. The algorithm can go pound sand.
Exactly what I like to see amazing article 🤩